This basic tutorial will show you how to create your first script (A basic Rapid Fire Script) and how it could be expanded on.
Step 1
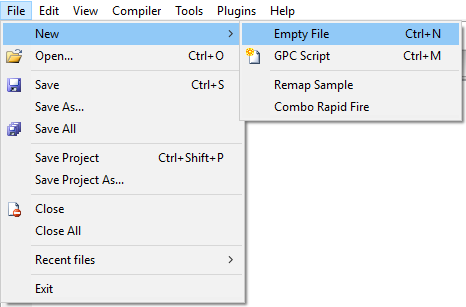
Load Cronus PRO and go to the File Dropdown menu and select New and then Empty File
Step 2
Either type or copy and paste the following code into the GPC code editor within Cronus PRO:
|
main{
if(get_val(XB1_RT)){
combo_run(RAPID_FIRE);
}
}
combo RAPID_FIRE{
set_val(XB1_RT, 100);
wait(40);
set_val(XB1_RT, 0);
wait(30);
set_val(XB1_RT, 0);
}
|
Step 3
Compile the code to check for errors. To do this, either press F7 on your keyboard or go to the Compiler dropdown menu in Cronus PRO and select compile:
The Output window below the GPC editor should give you this message;
|
------ GPC: Build started ------
> 1: New* :
> Bytecode size: 148 bytes (3.6%)
> Stack memory: 3 words (2.7%)
Build succeeded with 0 warnings...
|
If your CronusMAX PLUS is connected via the PC PROG port and you have controller connected, you can see this script in action by using the Build and Run option. This is accessed by either pressing F5 or selecting Build and Run in the Compiler Dropdown menu. This function will compile the code and then send it to your CronusMAX PLUS so you can test it.
Script Breakdown
What this script does is run the combo named RAPID_FIRE whenever the right trigger has a value or is pressed. If the Right Trigger is still held when the combo ends, it will be run again.
To analyse how the CronusMAX PLUS is told how to do this we must first break the script down into its two sections, the main and combo sections.
The Main Section
|
main{
if(get_val(XB1_RT)){
combo_run(RAPID_FIRE);
}
}
|
As explained
here, the main section is run in a loop by the CronusMAX PLUS. The Virtual Machine in the CronusMAX runs through the code in order and when it reaches the end of the code, data is sent to the console and then the Virtaul Machine starts the next loop.
The above line is telling the CronusMAX that if the statement is TRUE, run the nested code. In this case, if XB1_RT (Right Trigger) has a value greater than 0 (Zero) so is pressed or not at rest.
|
{
combo_run(RAPID_FIRE);
}
|
Above is the code nested within the if statement. Nesting code creates a hierarchical structure. An open curly bracket ( { )starts the nesting and a closed curly bracket ( } ) ends it. By nesting code within the if statement we are telling the CronusMAX that we only wish for that code to be executed only when the if statement is TRUE. More information on nesting code can be found here.
This line simply tells the CronusMAX to run the combo named RAPID_FIRE. It is important to note that if the CronusMAX receives this instruction and the combo is already running it will not do anything. It will only run the combo again if it has finished. This means that if you hold down the Right Trigger with this code active, the CronusMAX start the combo and then run it again as soon as it has ended. Therefore running the combo in an indefinite loop or until such time as the Right Trigger is released.
The Combo Section
|
combo RAPID_FIRE{
set_val(XB1_RT, 100);
wait(40);
set_val(XB1_RT, 0);
wait(30);
set_val(XB1_RT, 0);
}
|
This is the combo which the CronusMAX is instructed to run when the Right Trigger is pressed. When run, a combo runs through the code until it gets to a wait statement. The wait statement instructs combo to execute the commands above it for a set amount of time which is expressed in milliseconds.
|
set_val(XB1_RT, 100);
wait(40);
|
These lines instruct the combo to set the value of the Right Trigger to 100 (or fully pressed) for 40 milliseconds.
|
set_val(XB1_RT, 0);
wait(30);
|
Once the 40 milliseconds has passed, these lines instruct the combo to set the Right Trigger to 0 (Release) for 30 milliseconds.
Additional detail on how a combo operates can be found here.
Expanding the code
Now that you understand how this script works, we will make it more complex and change when the combo is run.
Look at this line in the main section;
and change it to;
|
if(get_val(XB1_RT) && !get_val(XB1_LT)){
|
by introducing && !get_val(XB1_LT) in to the if statement we are telling the CronusMAX to only run the combo if the Right Trigger has a value and the Left Trigger does not.
&& means 'and' in GPC and ! means not. So the if statement now reads 'if Right Trigger has a value and Left Trigger does not'. Which means when using this code in game the CronusMAX will only Rapid Fire your gun when you are not aiming down the sights.
You can use the build and run function to see this code in action.