Introduction
|
|
|
GamePack Author(s):
KittyDawn
Compatible CronusMAX Firmware: 1.24+
Compatible Controllers: Dualshock 4, Dualshock 3, Xbox One, Xbox 360, Wii U Pro
Compatible Systems: PlayStation 4, Xbox One, PlayStation 3, and Xbox 360.
The Destiny GamePack boasts a new Anti-Recoil with Dual Presets Mod that can be activated and adjusted in-game by an easy to use Toggle System. Other essentials include Adjustable
Rapid Fire, Adjustable Burst Fire,
Easy Super, Melee Modifier,
Auto Sprint, Auto Double Jump, and
the exclusive Quick Mod Shortcuts for Destiny,
which removes the redundant actions of the D-Pad
such as pointing and waving and turns them into something more
useful, including Auto Slide, Quick
Sub-Class Changer, Auto Enter Sparrow, and
Auto Goto Orbit.
We also invite you to join the Cronus Discord Channel - setup and run by members of the Cronus Community. There are several channels dedicated to GamePacks which offer live support and feedback, including direct support from senior members of the Cronus Community. Use this link to join our server: https://discord.gg/mJgQyM4
|
|
|
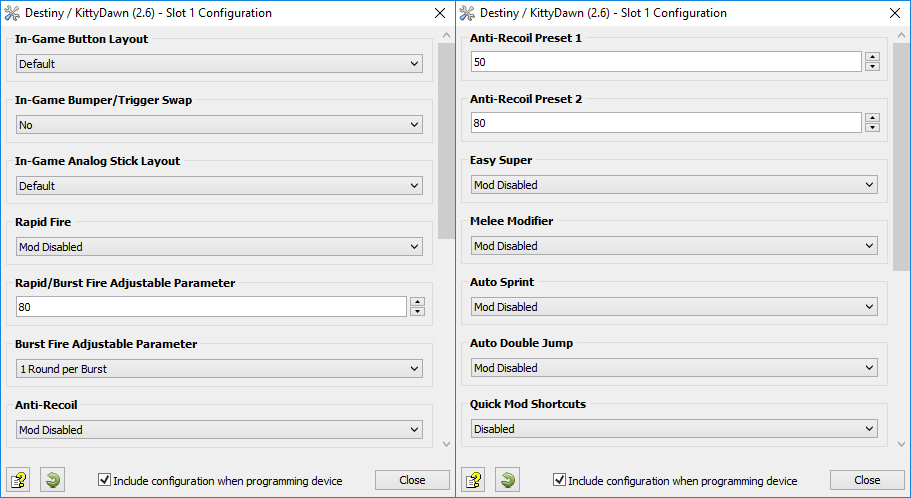
GamePack GCI Options
|
|
|
All GamePacks have Mods that can be tuned and customized to your
preference. This scripting engine is what makes the CronusMAX so
powerful and extremely popular with the gaming community. Gaming Mod
configuration is now made more accessible than ever before with the
new GCI (GamePack Configuration Interface).
It pops up as soon as you program the GamePack to your Cronus ( Video). Some
Mods can be directly enabled/disabled here, and some are disabled
in-game by default, but have several available options that can be
set here and then enabled or activated while in-game.
|
|
|
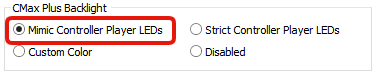
GamePack Setup
|
|
|
If you have a CronusMAX PLUS, open the Cronus PRO software and go to
Tools > Options > CMax Plus and enable "Mimic
Controller Player LEDs" for the backlight LED features
to work.
|
|
|
|
|
|
|
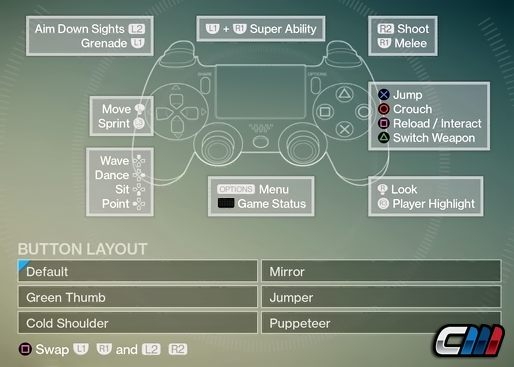
Class 1
In Game Button Layout
|
Most users play Destiny using the default button layout but a lot of players do
use optional button layouts. With the In Game Button Layouts you can make any of
the Mods on the CronusMAX PLUS work with your favorite configurations, so select
the option here which matches your in game options and the GamePack will
optimize all Mod Classes to your preferred layout. NOTE: This step is
very important. If you don't select the correct layout that you are using in
game, the Mods in this GamePack will not work correctly.
|
Mod
|
Name
|
|
|
Default
|
|
|
Green Thumb
|
|
|
Cold Shoulder
|
|
|
Mirror
|
|
|
Jumper
|
|
|
Puppeteer
|
|
|
|
|
|
Class 2
In-Game Bumper/Trigger Swap
|
In this class, you inform the GamePack if you have the triggers and bumpers
swapped within the in game options. NOTE: This step is very important.
If you don't select the correct layout that you are using in game, the Mods in
this GamePack will not work correctly.
|
|
|
|
|
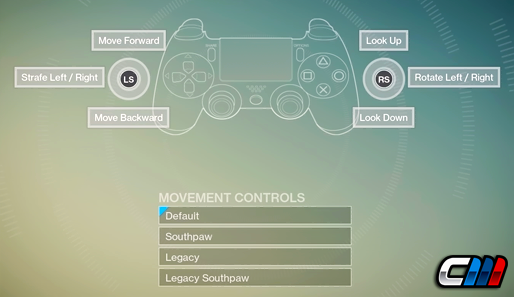
Class 3
In-Game Analog Stick Layout
|
Here you let the GamePack know which stick layout you are using in game so it
can optimize the appropriate Mods.
NOTE: This step is very important. If you don't select the correct
layout that you are using in game, the Mods in this GamePack will not work
correctly, especially Anti-Recoil.
|
Mod
|
Name
|
|
|
Default
|
|
|
Southpaw
|
|
|
Legacy
|
|
|
Legacy Southpaw
|
|
|
When Rapid Fire is enabled, you can turn virtually any semi automatic weapon
into a fully automatic weapon. This creates a very unique advantage for players
using semi automatic weapons. While Rapid Fire will not usually make a fully
automatic gun shoot any faster, it can have positive side effects on fully
automatic guns such as reducing recoil, helping players conserve ammunition and
achieve more headshots.
|
Mod
|
Name
|
Description
|
|
|
Mod Disabled
|
|
|
|
Adjustable Rapid Fire
Adjustable
|
With Adjustable Rapid Fire you can always get the optimum
firepower for your favorite weapon. See the menu system
instructions above for more information on how to adjust your
Rapid Fire speed in this mode.
|
|
|
Burst Fire
|
This Mod enables Burst Fire mode, turning your automatic or
single shot weapons into a Burst Fire weapon. See Class 5 for
more details.
|
Mod Shortcut (Class 11 must be enabled) - When not aiming down the
sights:
|
|
Press Right on D-Pad
|
To enable/disable Rapid Fire
|
|
|
Burst firing is designed to turn semi automatic and automatic weapons into burst
firing weapons. When this feature is enabled in Class 4, your weapon will fire
in bursts and can be set to 1, 2, 3, 4, 5, or 6 round bursts. Burst firing can
help reduce recoil and conserve ammunition.
|
Mod
|
Name
|
|
|
1 Round per Burst
|
|
|
2 Rounds per Burst
|
|
|
3 Rounds per Burst
|
|
|
4 Rounds per Burst
|
|
|
5 Rounds per Burst
|
|
|
6 Rounds per Burst
|
|
|
This Mod compensate for vertical recoil while firing a weapon by automatic
moving the control stick in the opposite direction of the one your gun is moving
while firing. The adjustable parameter sets how much the compensation should be.
This Anti-Recoil Mod comes with two special presets which also gives you control
of the recoil weight. See the options below for adjusting the Presets and
Anti-Recoil weight.
Remember, there isn't a one-size-fits-all setup for Anti-Recoil sensitivity due
to different weapons having different perks and attachments affecting weight
distribution. We suggest you try different adjustable values with each weapon
and set to whatever you feel works best for you. We would appreciate if you
share these values with the CronusMAX Support Community
to help others :)
TIP
If your weapon is moving UP when you fire, you
need a LARGER number in the adjustable parameter.
If your weapon is moving DOWN when you fire, you need a SMALLER
number in the adjustable parameter.
|
Mod
|
Name
|
Description
|
|
|
Mod Disabled
|
|
|
|
Anti-Recoil
Always On
|
Anti-Recoil is activated while firing.
|
|
|
Anti-Recoil
Scope Enable
|
Anti-Recoil is activated while firing and aiming.
|
|
|
Anti-Recoil
Scope Disable
|
Anti-Recoil is activated while firing and NOT aiming.
|
Anti-Recoil comes with two presets - While Aiming Down Sights:
|
|
Press Left on D-Pad
|
to select Preset 1
|
|
|
Press Right on D-Pad
|
to select Preset 2
|
|
|
Press Up on D-Pad
|
to increase Anti-Recoil weight for active preset.
|
|
|
Press Down on D-Pad
|
to decrease Anti-Recoil weight for active preset.
|
|
|
Press Back
|
to save both presets.
|
|
|
Have you ever needed to active your super in a rush and accidentally wasted a
grenade, punched the air or do you simply find it a pain pressing both buttons
at the same time? Again, CronusMAX comes to the rescue. When this exclusive Mod
is active, pressing the player highlight button will instead press the two
buttons to activate your super instead!
For example, with the default layout and Stick controls, pressing the RS/R3 will
press the LB/L1 and RB/R1 at exactly the same time, thus making it a lot easier
to activate your super.
TIP
Please ensure Class 1 and 2 match your in game
settings for this MOD.
|
Mod
|
Name
|
|
|
Mod Disabled
|
|
|
Mod Enabled
|
|
|
This Mod changes the operation of the Melee button. It can either make you
automatically jump forward and punch when you tap the melee button or it can
repeatedly press the melee button when you hold it down.
NOTE
Using this MOD can make activating your "Super" quite
difficult. If you do choose to use it, we recommended that you also
enable Class 7 so you can activate your super with ease.
|
Mod
|
Name
|
Description
|
|
|
Mod Disabled
|
|
|
|
Jump Melee
Quick Tap Activation
|
The Jump Melee Mod will automatically make the character jump,
move forward and melee.
NOTE: While this Mod is active, press and hold the melee button for a normal melee
|
|
|
Turbo Melee
|
Press and hold the melee button and it will automatically be
pressed again for the next melee action.
|
|
|
Are you tired of having to press the sprint button each time you move forward?
If so, this Mod is for you.
IMPORTANT
Auto sprint is automatically temporary disabled when
Reloading, in ADS, shooting and using MOD shortcuts.
|
Mod
|
Name
|
Description
|
|
|
Mod Disabled
|
|
|
|
Fully Auto
|
Your character will sprint at the same time you begin to move
him forward.
|
|
|
Press Sensitive
|
Your character will sprint if the analog stick is FULLY pressed
forward. The character will walk regular speed if the analog
stick is only slightly pressed forward.
|
|
|
|
|
|
Class 10
Auto Double Jump
|
This Mod will automate the task of double jumping in Destiny. When active, if
you press and hold the jump button, it will automatically press it a second
time.
If you quickly tap the jump button, it will perform a single jump.
|
Mod
|
Name
|
|
|
Mod Disabled
|
|
|
Mod Enabled
|
|
|
|
|
|
Class 11
Quick Mod Shortcuts
|
When active, this Mod removes the redundant actions of the D-Pad such as
pointing and waving and turns them into something more useful.
|
Mod
|
Name
|
|
|
Disabled
|
|
|
Enabled
|
If enabled and the player is not aiming down their sights (in ADS), this
Mod will assign the following to the D-Pad controls:
|
|
Press Up on D-Pad
|
Auto Slide - This shortcut will make the character sprint
forward briefly and then slide.
|
|
|
Press Down on D-Pad
|
Quick Sub-Class Change - This shortcut will pause the game, move
the cursor over and change to your alternative sub-class.
|
|
|
Press Left on D-Pad
|
Auto Enter Sparrow - This shortcut will enter Nav move and
automatically hold the button to board your Sparrow.
|
|
|
Press Right on D-Pad
|
Enable/Disable Rapid Fire or Burst Fire - If either Rapid Fire
or Burst Fire are enabled, this shortcut allows you to quickly
switch them on/off.
|
|
|
Press Back + Y
Select + Triangle
|
Auto Goto Orbit - This shortcut will enter Nav mode and hold the
button to take you to orbit and save you holding that button for
what feels like 5 minutes at times!
|
|
Automatic PS4 Crossover
|
|
|
When this GamePack is being used on a PlayStation 4 and detects the
connected controller is not a DualShock 4, it will automatically
reassign Touchpad to the Select/Back/View Button and enable a toggle
to the PS4 Share Screen.
|
|
|
Crossover
Shortcut to DualShock 4 Touchpad:
Toggle
to PlayStation 4 Share Screen:
Troubleshooting
|
|
|
If you find your GamePack isn't working correctly, the memory in the Cronus device where the settings are stored may have become corrupted. In this case, we recommend that you erase your memory slots using the Cronus Pro option in Tools > Device Cleanup > Erase Memory Slots. There will be an option to clear the memory slots in Cronus Pro. This step is not necessary, although recommended if you're not using the other slots.
If you're still having issues and want to check that your Cronus Device is functioning correctly with scripts, but you're not too sure how to test, we recommend you try out the easy to use Cronus Stress Test Script by Cronus Community senior staff member, Lex Lost.
|
|
|
Destiny, and the Destiny logo are registered or unregistered trademarks of Bungie, Inc. in the U.S. and/or other countries.
The “PS” Family logo is a registered trademark and “PS4” is a trademark of Sony Computer Entertainment Inc.
Microsoft, Xbox One and the Xbox logos are trademarks of the Microsoft group of companies.
Other product names used herein are for identification purposes only and might be trademarks of their respective companies. We disclaim any and all rights to those marks.
|