Halo Master Chief Collection - Halo 4
Introduction
|
|
|
GamePack Author(s): KittyDawn
Compatible CronusMAX Firmware: 1.24+
Compatible Controllers: Dualshock 4, Dualshock 3, Xbox One, Xbox 360, Wii U Pro
Compatible Systems: Xbox One and Microsoft Windows
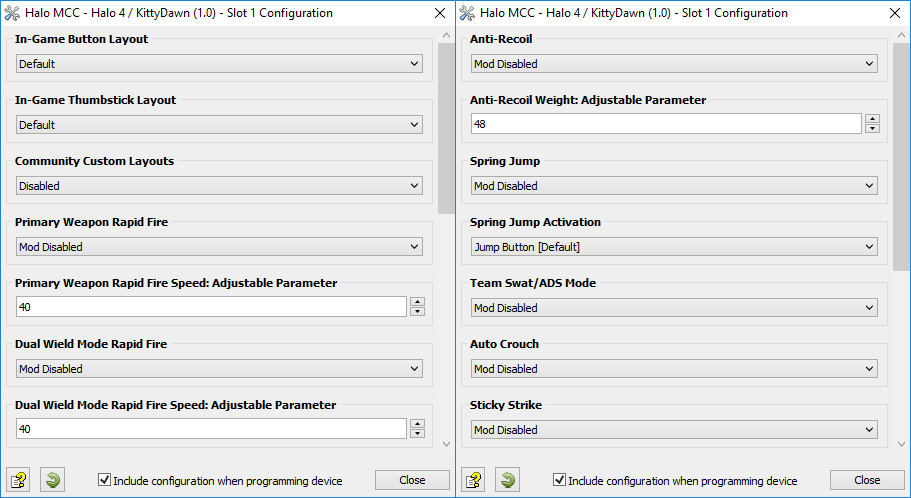
The Halo Master Chief Collection - Halo 4 GamePack features everything you need to do battle with the UNSC Naval Special Warfare Command, including a special Team SWAT/ADS Mode and an incredible Dual Wielding Rapid Fire System. Other features include Adjustable Rapid Fire both Primary and Secondary, Anti-Recoil, Spring Jump, Auto Crouch and Sticky Strike. All the different default button layouts are also supported, including Boxer, Green Thumb, Bumper Jumper, Recon, Fishstick, Universal Default (Recon), Universal Reclaimer, Universal Zoom & Shoot, Universal Bump & Jump and Universal Green Fingers - as well as both Thumbstick layouts. These Mods are guaranteed to improve your overall gameplay experience while giving a competitive edge.
We also invite you to join the Cronus Discord Channel - setup and run by members of the Cronus Community. There are several channels dedicated to GamePacks which offer live support and feedback, including direct support from senior members of the Cronus Community. Use this link to join our server: https://discord.gg/mJgQyM4
|
|
|
GamePack GCI Options
|
|
|
All GamePacks have Mods that can be tuned and customized to your preference. This scripting engine is what makes the CronusMAX so powerful and extremely popular with the gaming community. Gaming Mod configuration is now made more accessible than ever before with the new GCI (GamePack Configuration Interface). It pops up as soon as you program the GamePack to your Cronus ( Video). Some Mods can be directly enabled/disabled here, and some are disabled in-game by default, but have several available options that can be set here and then enabled or activated while in-game.
|
|
|
GamePack Setup
|
|
|
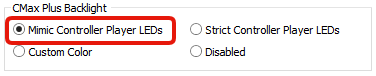
If you have a CronusMAX PLUS, open the Cronus PRO software and go to Tools > Options > CMax Plus and enable "Mimic Controller Player LEDs" for the backlight LED features to work.
|
|
|
|
|
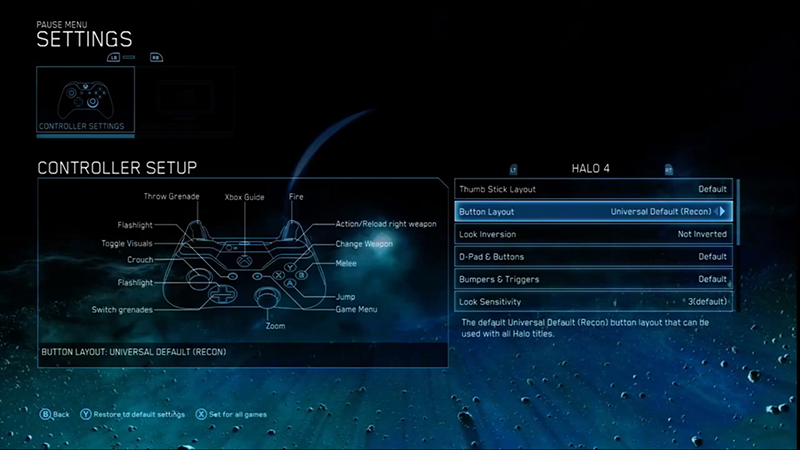
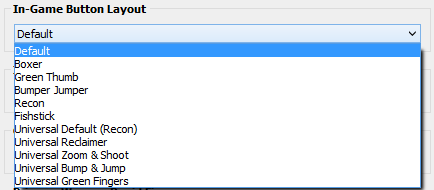
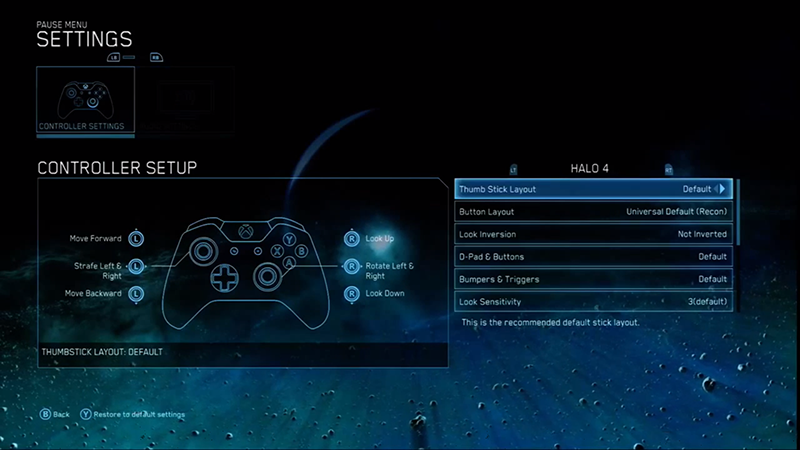
In-Game Button Layout
Setup Step 1
|
All default Halo MCC button layout options are available in this GamePack. Use the GCI (see below) to select the one you are using, and the GamePack will automatically adjust all the Mods to your preferred choice.
Tip
|
|
|
Make the options menu your first stop when you fire up Halo MCC. Go into the control settings and switch from default to "Bumper Jumper" controls, it's our favorite. This allows you to jump and aim at the same time, instead of having to take your thumb off the stick to press jump or melee, you can just tap the bumpers.
|
|
|
MENU/OPTIONS BUTTON> SETTINGS > CONTROLLER SETUP > BUTTON LAYOUT
NOTE: This step is critical. If you don't select the correct button layout that you are using in-game, the Mods will not function correctly, especially Anti-Recoil. Use these game provided layouts for optimal GamePack performance.
|
Option
|
Name
|
|
|
Default
|
|
|
Boxer
|
|
|
Green Thumb
|
|
|
Bumper Jumper
|
|
|
Recon
|
|
|
Fishstick
|
|
|
Universal Default (Recon)
|
|
|
Universal Reclaimer
|
|
|
Universal Zoom & Shoot
|
|
|
Universal Bump & Jump
|
|
|
Universal Green Fingers
|
|
|
|
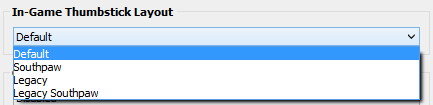
In-Game Thumbstick Layout
Setup Step 2
|
All default Halo MCC thumbstick layout options are available in this GamePack. Use the GCI (see below) to select the one you are using, and the GamePack will automatically adjust all the Mods to your preferred choice.
MENU/OPTIONS BUTTON> SETTINGS > CONTROLLER SETUP > THUMB STICK LAYOUT
NOTE: This step is critical. If you don't select the correct thumbstick layout that you are using in-game, the Mods will not function correctly, especially Anti-Recoil. Use these game provided layouts for optimal GamePack performance.
|
Option
|
Name
|
|
|
Default
|
|
|
Southpaw
|
|
|
Legacy
|
|
|
Legacy Southpaw
|
|
|
|
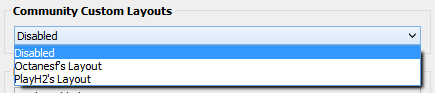
Community Custom Layouts
Setup Step 3
|
|
Option
|
Name
|
Notes
|
|
|
Octanesf's Layout
|
This custom layout swaps the Left Trigger/L2 with the Left Bumper/L1 and the Right Bumper/R1 with B/Circle.
|
|
|
PlayH2's Layout
|
This custom layout swaps the Left Bumper with A.
|
|
|
|
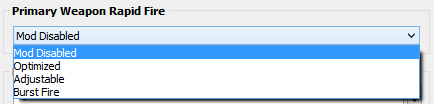
Primary Weapon Rapid Fire
Mod 1 - Speed Toggle
|
When Primary Weapon Rapid Fire is enabled, you can turn virtually any semi-automatic weapon into a deadly, fully automatic weapon. This creates a very unique advantage for players using semi-automatic weapons and some shotguns too. Rapid Fire is not meant for fully automatic weapons, however it can have positive side effects such as reducing recoil, helping players conserve ammunition and achieve more headshots due to a slower, more controlled fire rate.
There are three options available: Optimized, Adjustable and Burst Fire. You can also customized how Rapid Fire is activated - see Fire Mode (Mod 4) below, and the Adjustable option allows you to enter a custom fire speed value. As always, timings depend on the type of weapon used and any add-ons or perks you may have. Adjustable Range is 20 - 500 (Default 40).
This Mod is disabled in-game by default; however, it can be enabled (or disabled) via a Speed Toggle during gameplay. Once enabled, the Mod will activate based on your GCI selection.
|
Console
|
Speed Toggle
|
|
|
|
|
|
|
|
|
|
|
|
|
|
|
|
Primary Weapon Rapid Fire Enable/Disable
|
Select one of the following options for Primary Weapon Rapid Fire in the GCI, including the adjustable fire speed (see images below). Note: This setting can only be applied in the GCI, not in-game, so whatever option you select here will always be the active choice whenever this Mod is in use.
|
Option
|
Name
|
Notes
|
|
|
Mod Disabled
|
|
|
|
Optimized
|
Optimized Rapid Fire is set to be as fast as possible, while ensuring every single shot is correctly registered by the game.
|
|
|
Adjustable
Adjustable
|
Adjustable Rapid Fire uses the custom speed you enter in the GCI (see image below).
|
|
|
Burst Fire
Adjustable (See Mod #2)
|
Burst Fire can reach a faster rate of fire with burst type weapons. The weapon can be set to 1, 2, 3, 4, 5, or 6 round bursts (See Mod 3 for more details). |
|
|
|
Dual Wield Rapid Fire
Mod 2 - Speed Toggle
|
When dual wielding guns, Rapid Fire Mods can be applied to the secondary weapon in your left hand. When Dual Wield Rapid Fire is enabled, you can turn virtually any semi-automatic weapon into a deadly, fully automatic weapon. This creates a very unique advantage for players using semi-automatic weapons and some shotguns too. Rapid Fire is not meant for fully automatic weapons, however it can have positive side effects such as reducing recoil, helping players conserve ammunition and achieve more headshots due to a slower, more controlled fire rate.
There are three options available: Optimized, Adjustable and Burst Fire. You can also customize how Rapid Fire/Burst Fire is activated - see Fire Mode (Mod 4) below, and the Adjustable option allows you to enter a custom fire speed value. As always, timings depend on the type of weapon used and any add-ons or perks you may have. Adjustable Range is 20 - 500 (Default 40).
This Mod is disabled in-game by default; however, it can be enabled (or disabled) via a Speed Toggle during gameplay. Once enabled, the Mod will activate based on your GCI selection. As you can see, there is a different toggle based on the button layout you are using.
|
Button Layouts 1-6
|
|
Console
|
Speed Toggle
|
|
|
|
|
|
|
|
|
|
|
|
|
|
|
|
Dual Wield Rapid Fire Enable/Disable
|
|
Button Layouts 7-11
|
|
Console
|
Speed Toggle
|
|
|
|
|
|
|
|
|
|
|
|
|
|
|
|
Dual Wield Rapid Fire Enable/Disable
|
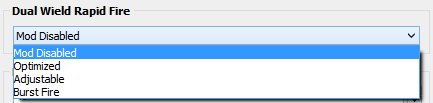
Select one of the following options for Dual Wield Rapid Fire in the GCI, including the adjustable fire speed (see images below). Note: This setting can only be applied in the GCI, not in-game, so whatever option you select here will always be the active choice whenever this Mod is in use.
|
Option
|
Name
|
Notes
|
|
|
Mod Disabled
|
|
|
|
Optimized
|
Optimized Rapid Fire is set to be as fast as possible, while ensuring every single shot is correctly registered by the game.
|
|
|
Adjustable
Adjustable
|
Adjustable Rapid Fire uses the custom speed you enter in the GCI (see image below).
|
|
|
Burst Fire
Adjustable (See Mod #2)
|
Burst Fire can reach a faster rate of fire with burst type weapons. The weapon can be set to 1, 2, 3, 4, 5, or 6 round bursts (See Mod 3 for more details). |
|
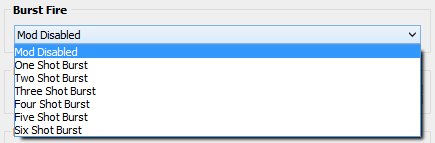
Burst fire is designed to turn semi-automatic and automatic weapons into burst firing weapons. When this feature is enabled, your weapon will fire in bursts and can be set to 1, 2, 3, 4, 5, or 6 round bursts. Burst firing can help reduce recoil and conserve ammunition.
|
Option
|
Name
|
|
|
Mod Disabled
|
|
|
One Shot Burst
|
|
|
Two Shot Burst
|
|
|
Three Shot Burst
|
|
|
Four Shot Burst
|
|
|
Five Shot Burst
|
|
|
Six Shot Burst
|
|
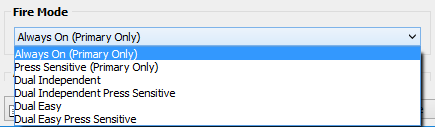
Select how Primary Weapon Rapid/Burst Fire ( Mod 1) and Dual Wield Rapid/Burst Fire ( Mod 2) is Activated. You can either have Rapid Fire or Burst Fire active as soon as you press the trigger or not until it is fully pressed. There are also options for Dual Independent and Dual Easy.
This Mod is set to Always On by default; however, it can be changed in the GCI (see image below). There is no Toggle for this option so it cannot be changed during gameplay.
|
Option
|
Name
|
Notes
|
|
|
Always On (Primary Only)
|
Primary Weapon Rapid/Burst Fire is activated as soon as the fire trigger is pressed.
|
|
|
Press Sensitive (Primary Only)
|
Primary Weapon Rapid/Burst Fire is not activated until the fire trigger is fully pressed.
|
|
|
Dual Independent
|
Rapid/Burst Fire is on for both weapons when Dual Wielding and will be activated as soon as the fire trigger is pressed.
|
|
|
Dual Independent Press Sensitive
|
Rapid/Burst Fire is on for both weapons when Dual Wielding and is not activated until the fire trigger is fully pressed.
|
|
|
Dual Easy
|
Rapid/Burst Fire is on for both weapons when Dual Wielding - the left weapon is automatically fired when the primary weapon is empty.
|
|
|
Dual Easy Press Sensitive
|
Same as option 5 except the above is only true when the primary weapon fire button is fully pressed.
|
|
|
|
Anti-Recoil
Mod 5 - Speed Toggle
|
The weapons in Halo have quite a bit of kick, so you have to learn how to compensate with them. This Mod compensates for vertical recoil while firing a weapon by automatically moving the control stick in the opposite direction of the one your gun is moving while firing. The adjustable parameter sets how much the compensation should be.
Remember, there isn't a one-size-fits-all setup for Anti-Recoil sensitivity due to different weapons having different perks and attachments affecting weight distribution. We suggest you try different adjustable values for each weapon as this will help fine tune your weapon's recoil weight. Adjustable Range is 1 - 100 (Default 48). Don't forget to share your best settings with the Cronus Community.
This Mod is disabled in-game by default; however, it can be enabled (or disabled) via a Speed Toggle during gameplay. Once enabled, the Mod will activate anytime the Fire Trigger is pulled.
|
Console
|
Speed Toggle
|
|
|
|
|
|
|
|
|
|
|
|
Anti-Recoil Enable/Disable
|
Tip
|
|
|
If your weapon is moving UP when you fire, you need a LARGER number in the adjustable parameter.
If your weapon is moving DOWN when you fire, you need a SMALLER number in the adjustable parameter.
Remember, higher in-game sensitivity = lower Anti-Recoil values. In-Game sensitivity is usually cranked up to the max when using a mouse.
|
|
|
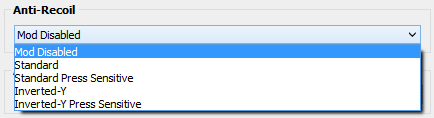
Select one of the following options for Anti-Recoil in the GCI, including the adjustable Anti-Recoil weight (see images below). Note: This setting can only be applied in the GCI, not in-game, so whatever option you select here will always be the active choice whenever this Mod is in use.
|
Option
|
Name
|
Notes
|
|
|
Mod Disabled
|
|
|
|
Standard
Adjustable
|
Anti-Recoil is activated while firing.
|
|
|
Standard Press Sensitive
Adjustable
|
Anti-Recoil is only activated when the trigger is fully pressed.
|
|
|
Inverted-Y
Adjustable
|
Anti-Recoil with Inverted-Y Axis is activated while firing. (Inverted-Y axis requires the in-game setting 'Look Inversion' to be set to 'Inverted' - see image below).
|
|
|
Inverted-Y Press Sensitive
Adjustable
|
Anti-Recoil with inverted aim is only activated when the trigger is fully pressed.
|
MENU/OPTIONS BUTTON> SETTINGS > CONTROLLER SETUP > LOOK INVERSION
|
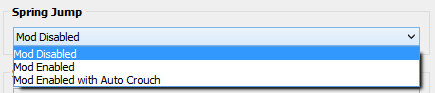
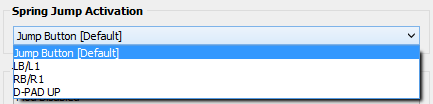
This Mod automates the task of 'Spring Jumping' in Halo. You can use the default Jump button to activate the mod, or you can select LB/L1, RB/R1 or D-Pad UP.
This Mod is disabled by default; however, it can be changed in the GCI (see image below). There is no Toggle for this option so it cannot be changed during gameplay.
|
Option
|
Name
|
Notes
|
|
|
Mod Disabled
|
|
|
|
Mod Enabled
|
To Spring Jump, press and hold the selected activation button (see below), this will cause your character to jump and crouch. When you land, you will still be crouched. Release the button when you are ready to 'Spring Jump'.
|
|
|
Mod Enabled with Auto Crouch
|
In this Mod, when at the apex of the Spring Jump, your character will automatically crouch for a brief period. This enables you to reach even higher ground than with a normal spring jump.
|
|
|
|
Team SWAT/ADS Mode
Mod 7 - Speed Toggle
|
We love the Team Swat Game mode but find that pressing the Zoom button twice to switch in and out of ADS slows gameplay down. We also use the Default setup so find pressing the RS a bit of a pain as it interferes with aiming. So we created this Mod. It will swap your Left Trigger with your Zoom Button. Not only that, it will press the Zoom button when you press and hold the Left Trigger and then press it again when you release the Left Trigger. Therefore turning Halo's Zoom system into the usual ADS that you are used to! If you wish to use this Mod outside of Team Swat, you will find that the usual function of your Left Trigger, has been moved to your Zoom button.
This Mod is disabled in-game by default; however, it can be enabled (or disabled) via a Speed Toggle during gameplay.
|
Console
|
Speed Toggle
|
|
|
|
|
|
|
|
|
|
|
|
|
|
|
|
Team SWAT/ADS Mode Enable/Disable
|
Set the following option for Team SWAT/ADS Mode in the GCI (see image below).
|
Option
|
Name
|
|
|
Mod Disabled
|
|
|
Mod Enabled
|
|
|
|
Auto Crouch
Mod 8 - Speed Toggle
|
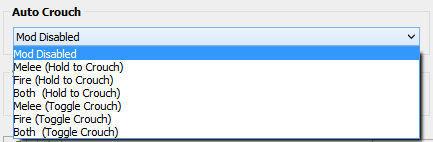
Automatically crouch your character when pressing your choice of Melee button, Fire Button or both, and if you want to Hold or Toggle the Crouch position. Many players do not expect this move and it can help reduce incoming damage from your opponent.
This Mod is disabled in-game by default; however, it can be enabled (or disabled) via a Speed Toggle during gameplay. Once enabled, the Mod will activate based on your GCI selection.
|
Console
|
Speed Toggle
|
|
|
|
|
|
|
|
|
|
|
|
|
|
|
|
Quick Reload Enable/Disable
|
Set the following options for Auto Crouch in the GCI (see image below). Note: This setting can only be applied in the GCI, not in-game, so whatever option you select here will always be the active choice whenever this Mod is in use.
|
Option
|
Name
|
|
|
Mod Disabled
|
|
|
Melee (Hold to Crouch)
|
|
|
Fire (Hold to Crouch)
|
|
|
Both Melee and Fire (Hold to Crouch)
|
|
|
Melee (Toggle Crouch)
|
|
|
Fire (Toggle Crouch)
|
|
|
Both Melee and Fire (Toggle Crouch)
|
|
With a Plasma Grenade equipped, a simple double tap of your Melee button (B/CIRCLE) will perform a Sticky Strike. This causes you character to throw a grenade at your opponent and automatically jump backwards to safety. This should be activated when you are close to your opponent. BXR does not work in Halo 2 Anniversary so this Mod is a suitable substitute.
This Mod is disabled by default; however, it can be enabled in the GCI (see image below). There is no Toggle for this option so it cannot be changed during gameplay.
|
Option
|
Name
|
|
|
Mod Disabled
|
|
|
Mod Enabled
|
|
Utility Toggles
|
|
|
Utility toggles are designed to give you additional control of the GamePack in real-time. A simple tap of a pre-configured button combo and the toggle is instantly activated.
|
|
|
|
|
Global Killswitch
Utility 1 - Speed Toggle
|
Quickly enable or disable the entire GamePack with this convenient killswitch toggle.
|
Console
|
Speed Toggle
|
LED
|
|
|
|
|
|
|
|
|
|
|
|
|
|
|
|
|
|
|
|
|
|
|
|
|
|
|
|
|
|
|
Led: GamePack On = Pink LED
GamePack Off = Blue LED
| |
Troubleshooting
|
|
|
If you find your GamePack isn't working correctly, the memory in the Cronus device where the settings are stored may have become corrupted. In this case, we recommend that you erase your memory slots using the Cronus Pro option in Tools > Device Cleanup > Erase Memory Slots. There will be an option to clear the memory slots in Cronus Pro. This step is not necessary, although recommended if you're not using the other slots.
If you're still having issues and want to check that your Cronus Device is functioning correctly with scripts, but you're not too sure how to test, we recommend you try out the easy to use Cronus Stress Test Script by Cronus Community senior staff member, Lex Lost.
|
|
|
Important
|
|
|
When using this GamePack for the first time, be sure to check each Mod to make sure everything is enabled or disabled precisely the way you want. With the built-in Toggles this should take only a couple of minutes and will also make you familiar with how to use and configure the GamePack. We have found this eliminates almost all issues that users have.
|
|
|
Halo 4 (MCC) GamePack - Toggle Cheat Sheet
|
|
SPEED TOGGLES
(HOLD VIEW/SHARE + BUTTON)
|
|
Primary Weapon Rapid Fire
Dual Wield Rapid Fire
Button Layouts 1-6
Dual Wield Rapid Fire
Button Layouts 7-11
Anti-Recoil
Team SWAT/ADS Mode
Auto Crouch
Utilities
Global Kill Switch
|
Halo Master Chief Collection and the Halo Master Chief Collection logo are trademarks or registered trademarks of Microsoft Corporation in the US and/or other countries.
The “PS” Family logo is a registered trademark and “PS4” is a trademark of Sony Computer Entertainment Inc.
Microsoft, Xbox One and the Xbox logos are trademarks of the Microsoft group of companies.
Other product names used herein are for identification purposes only and might be trademarks of their respective companies. We disclaim any and all rights to those marks.
|