This exclusive The Last of Us GamePack is packed with 24 separate Mods spread over 12 classes all custom designed by our very own hugely popular GPC scripting legend, KittyDawn.
Instructions for The Last of Us GamePackCompatible CronusMAX PLUS Firmware: 1.24+
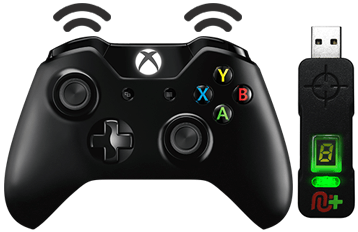
Compatible Controllers: Dualshock 4, Dualshock 3, Xbox One, Xbox 360, Wii U Pro Compatible Systems: Playstation 4 and Playstation 3
IMPORTANT
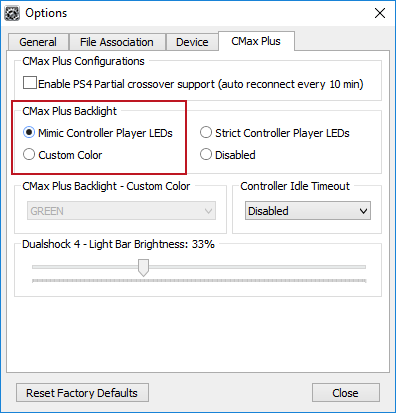
If you have a CronusMAX PLUS, make sure you goto Tools > Options > CMax Plus and enable "Mimic Controller Player LEDs" in the CMax Plus Backlight area if you want the CronusMAX PLUS Backlight LED features to work. Also, for more information on the benefits of using a USB Hub with your CronusMAX PLUS Click Here
Automatic PS4 Crossover
When this GamePack is being used on a PlayStation 4 and detects the connected controller is not a DualShock 4, it will automatically reassign Touchpad to the Select/Back/View Button.
Shortcut to Access The PlayStation 4 Share Screen:
Press Select + Left Analog Stick (L3) together.
Press Back + Left Analog Stick (LS) together.
Press View + Left Analog Stick (LS) together.
GamePack Operation
Quick Disable/Re-Enable GamePack:
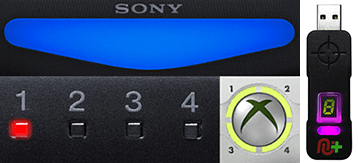
Player LED 1: Controller in regular mode, the GamePack is Disabled (Blue on DS4 / CronusMAX PLUS Backlight LED).
Player LED 4: The GamePack is Enabled (Pink on DS4 / CronusMAX PLUS Backlight LED).
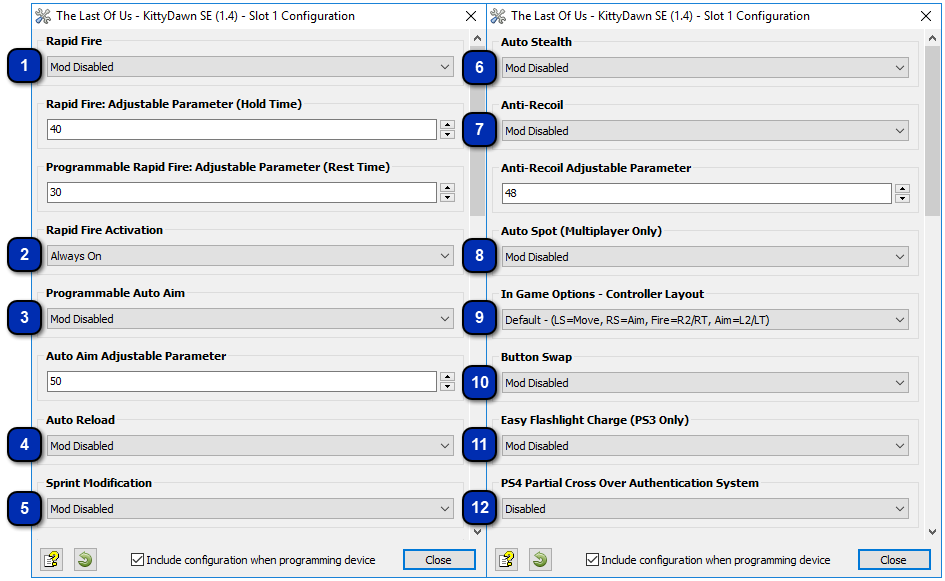
GamePack Configuration
GCI (GamePack Configuration Interface) Operation:
All GamePacks have Mods that can be tuned and customized to your own preference. This is what makes the CronusMAX so powerful and extremely popular with the gaming community. The settings are usually made using the controllers built in GamePack Menu Mode, as explained below. However, there is a much easier and quicker method via the new GCI (GamePack Configuration Interface).
NOTE
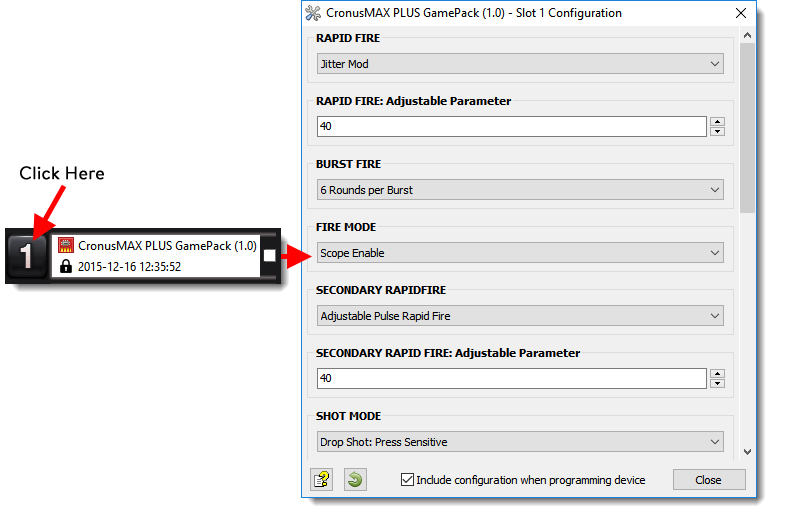
Pre-configure your GamePack settings using the GamePack Configuration Interface (GCI) in the Cronus PRO software. The GCI opens automatically when you load a GamePack to a memory slot, or you can simply click on the memory slot number to the left of the loaded GamePack to open the GCI. As soon as you select your preferred settings, close the GCI and click the PROGRAM DEVICE button. To select the GamePack you wish to use on your console, press the Memory Slot button on the CronusMAX PLUS so that it highlights the corresponding number on the LED (so if you have a GamePack loaded to Memory Slot 1, the LED on the CronusMAX PLUS should display the number 1).
How to Enter GamePack Menu Mode:
Note 1: If you are on a PlayStation 4 console use TouchPad instead of Share (DualShock 4 Controllers)*
Note 2: The Menu is navigated via the CronusMAX PLUS LED System and also the controller's Player Number LED's if available. It is not an on-screen menu. Click Here for an instructional video.
Hold SELECT+START for 2 seconds to enter menu mode.
Hold SHARE+OPTIONS for 2 seconds to enter menu mode*
Hold BACK+START for 2 seconds to enter menu mode.
Hold VIEW+MENU for 2 seconds to enter menu mode.
IMPORTANT
Always keep the SELECT / SHARE / BACK / VIEW button pressed while in Menu Mode. To exit Menu mode, release the SELECT / SHARE / BACK / VIEW button.
Player LED 4 will blink the number of the current Class (DS4 / CronusMAX PLUS Backlight LED will flash Pink).
Player LED 3 will blink the number of the active Mod for the current Class (DS4 / CronusMAX PLUS Backlight LED will flash Green).
Note: If the Player LED 3 is not blinking, it means either no Mod is loaded/disabled or the default setting is selected for the current Class. See below for instructions how to navigate between Classes and Mod's.
If you have an Xbox One Controller, the Right Trigger will rumble the number of the current Class (CronusMAX PLUS Backlight LED will flash Pink).
If you have an Xbox One Controller, the Left Trigger will rumble the number of active Mod for the current Class (CronusMAX PLUS Backlight LED will flash Green).
To Navigate Between Classes:
Goes Up
Goes Down
To Navigate Between Mods Within the Current Class:
Goes Up
Goes Down
GamePack Classes and Mods
Class 1
Rapid Fire
When Rapid Fire is enabled, you can turn virtually any semi automatic weapon into a fully automatic weapon. This creates a very unique advantage for players using semi automatic weapons in The Last of US PvP game modes. While Rapid Fire will not usually make a fully automatic gun shoot any faster, it can have positive side effects on fully automatic guns such as reducing recoil, helping players conserve ammunition and achieve greater accuracy.
HOW TO ADJUST RAPID FIRE SPEED
You can adjust Rapid Fire speed and test your settings within the game menu and with each weapon without having to set/save/restart every time to test each setting and each weapon (These settings are for MOD 1 & 2 - see further below for the MOD 3 Programmable Rapid Fire Controls). This is a new awesome feature that allows you to optimize your weapon's settings on-the-fly saving you a TON of time! (In Menu Mode: LB/L1 Reduce Value Increases Rate of Fire - RB/R1 Increase Value Reduces Rate of Fire - RT/R2 Test).
Increases
Rate of Rapid Fire
Decreases
Rate of Rapid Fire
Test current
Rate of Rapid Fire
Mod
Name
Description
0
Mod Disabled
1
Optimized Rapid Fire Adjustable
This Rapid Fire is optimized to be as fast as possible but at the same time ensures that every single shot is correctly registered by the game.
2
Adjustable Rapid Fire Adjustable
With Adjustable Rapid Fire you can always get the optimum firepower for your favorite weapon. See the menu system instructions above for more information on how to adjust your Rapid Fire speed in this mode.
3
Fully Programmable Rapid Fire
Adjustable
With this fully programmable Rapid Fire you can precisely set the amount of time the fire button should be held down and how long it should be released. For example you can set it to fire for 100ms and wait 60ms for the next firing loop. See below for programming options.
When in Menu Mode and Class 1/Mod 3 is selected (Fully Programmable Rapid Fire Options):
Rapid Fire is only enabled when aiming as the Fire button is also used to reload your weapon/apply health packs etc. Here you can select whether the Rapid Fire activates as soon as you press the fire button or when it is fully pressed.
Mod
Name
Description
0
Mod Enabled
Rapid Fire Always Enabled
1
Press Sensitive
Rapid Fire is only active when the fire button is fully pressed (100%)
This Mod automates the task of pressing the Aim button, which is required to shoot in The Last of Us. This Mod is fully adjustable so you can set the sensitivity to your personal preference..
Mod
Name
0
Mod Disabled
1
Mod Enabled
When in Menu Mode and this class:
Press LB/L1
To reduce the amount the trigger has to be pressed to activate the aim button.
Press RB/R1
To increase the amount the trigger has to be pressed to activate the aim button.
This Mod gives you 3 options to make sprinting easier in game.
Mod
Name
Description
0
Mod Disabled
1
Auto Sprint
This Mod will press and hold the sprint button whenever you move you character forward.
2
Press Sensitive
This Mod will sprint if the movement stick is FULLY pressed forward. The character will walk regular speed if the movement stick is only slightly pressed forward.
3
Toggle Sprint
This Mod saves you from holding the sprint button down and turns it into a toggle switch. Press once to hold the toggle button on, press again to release the sprint button.
This Mod compensates for vertical recoil while firing a weapon by automatically moving the control stick in the opposite direction of the one your gun is moving while firing. The adjustable parameter sets how much the compensation should be.
Remember, there isn't a one-size-fits-all setup for Anti-Recoil sensitivity due to different weapons having different perks and attachments affecting weight distribution. We suggest you try different adjustable values with each weapon and set to whatever you feel works best for you. We would appreciate if you share these values with the CronusMAX Support Community to help others :)
HOW TO ADJUST ANTI-RECOIL IN GAME
You can now adjust Anti-Recoil and test your settings within the game menu and with each weapon without having to set/save/restart every time to test each setting and each weapon. This is a new awesome feature that allows you to optimize your weapon's settings on-the-fly saving you a TON of time! (In Menu Mode: LB/L1 Decrease Weight - RB/R1 Increase Weight - RT/R2 Test).
Increases
Weight of Anti-Recoil
Decreases
Weight of Anti-Recoil
Test current
Weight of Anti-Recoil
TIP
If your weapon is moving UP when you fire, you need a LARGER number in the adjustable parameter.
If your weapon is moving DOWN when you fire, you need a SMALLER number in the adjustable parameter.
Mod
Name
Description
0
Mod Disabled
1
Anti-Recoil
Normal Controls
Anti-Recoil for users with normal aim settings in game
2
Anti-Recoil Inverted Controls
Anti-Recoil for users with inverted aim settings in game
Automatically spot your opponents. With Auto Spot active your character will mark where your opponents are located simply by aiming in their general direction. A ridiculous advantage in team matches.
IMPORTANT
This MOD is only available in PvP Gamemodes only and is only active while aiming.
If you use something other than the default control settings in game, tell the pack what your settings are here so it knows which buttons/sticks to activate for each Mod.
Do you have RSI from constantly having to shake your controller to charge your flash light? Not to worry, CronusMax has you covered again. With this Mod you simply have to press the View Event button (LS/L3 by default) to charge you flash light.
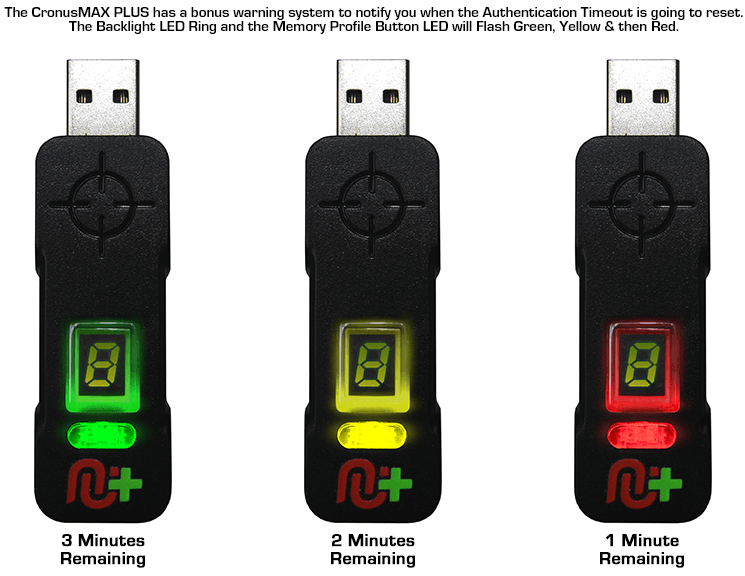
PlayStation 4 Partial Crossover Authentication Timeout Notification
When using a non-DS4 controller on a PlayStation 4, the authentication will timeout after 10 minutes and the signal will reset between the console and the controller (If you are not using the latest CronusMAX PLUS 1.20+ Firmware Update and a USB Hub). This only takes less than a second but can interrupt gameplay. You have the option of being notified when the controller authentication is about to timeout so this gives you time to prepare so you're not caught in a compromising position. You can choose to either be notified by LED 4, the CronusMAX PLUS Backlight LED or Trigger Rumble. The LED flashing and trigger rumbles will become more frequent the less time you have until an automatic reset will occur. You can set this Mod to start notifying you X amount of Minutes and Seconds from when the Auth Timeout will occur.
IMPORTANT INFO
You can hold back/select/view and press B/Circle to manually reset the authentication timer. You can also press Back/Select/View + LS/L3 to access the share screen.
NOTE
This MOD is not required if you are using a USB Hub for PS4 Full Time Cross Over Support.
Mod
Name
Backlight LED Color
0
Mod Disabled
Green - If you are using a CronusMAX PLUS firmware v1.20+ and a USB Hub for Full Time PS4 Crossover Support there is no need for this Mod so you can disable it.