
GamePack Operation |
 |
 |
 |
 |
 |
|
|
 |
 |
|
 |
 |
 |
|
 |
 |
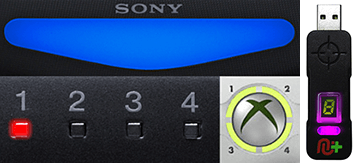 |
Player LED 1: Controller in regular mode, the GamePack is
Disabled (Blue on DS4 /
CronusMAX PLUS Backlight LED).
Player LED 4: The GamePack is Enabled (Pink on DS4 / CronusMAX PLUS Backlight
LED).
|
GamePack Configuration |
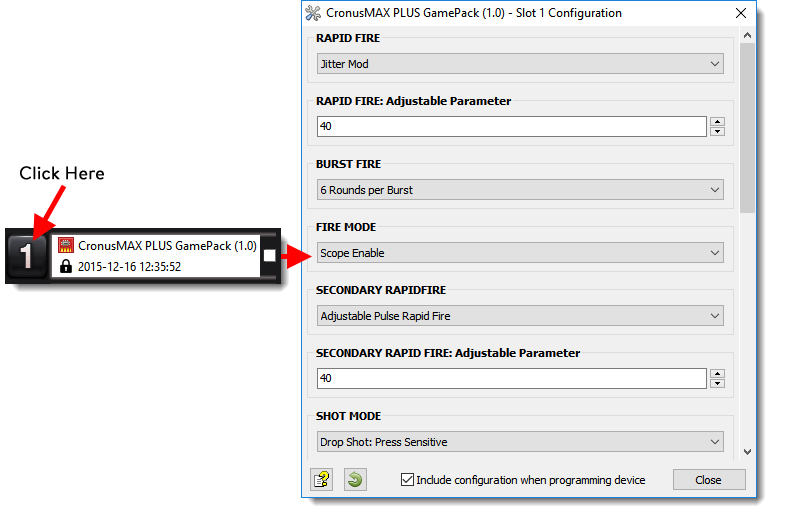
Pre-configure your GamePack settings using the GamePack Configuration Interface (GCI) in
the Cronus PRO software. The GCI opens automatically when you load a GamePack to a memory slot, or
you can simply click on the memory slot number to the left of the loaded GamePack to open the GCI.
As soon as you select your preferred settings, close the GCI and click the PROGRAM DEVICE button. To
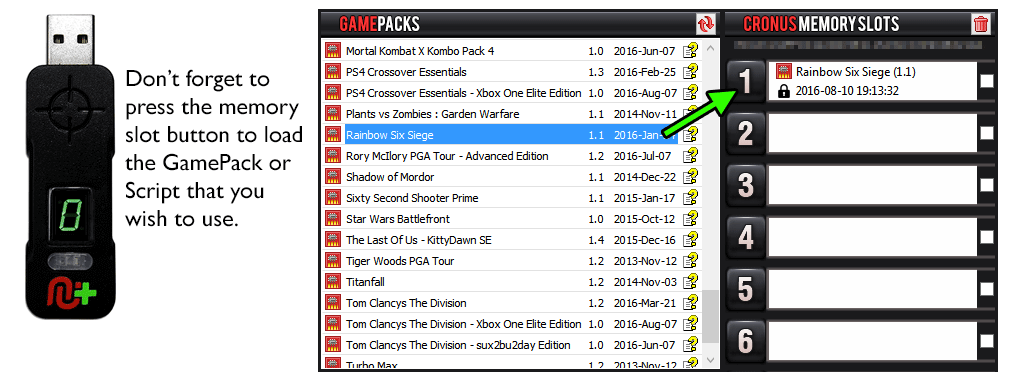
select the GamePack you wish to use on your console, press the Memory Slot button on the CronusMAX
PLUS so that it highlights the corresponding number on the LED (so if you have a GamePack loaded to
Memory Slot 1, the LED on the CronusMAX PLUS should display the number 1).
|
|
|
 |
|
Hold SELECT+START for 2 seconds to enter menu mode.
|
|
|
|
 |
|
Hold SHARE+OPTIONS for 2 seconds to enter menu mode*
|
|
|
|
 |
|
Hold BACK+START for 2 seconds to enter menu mode.
|
|
|
|
 |
|
Hold VIEW+MENU for 2 seconds to enter menu mode.
|
|
|
Player LED 4 will blink the number of the current Class
(DS4 / CronusMAX PLUS Backlight LED will flash Pink).
Player LED 3 will blink the number of the active Mod for
the current Class (DS4 / CronusMAX PLUS Backlight LED will flash Green).
Note: If the Player LED 3 is not blinking, it means either no Mod is
loaded/disabled or the default setting is selected for the current Class. See below for
instructions how to navigate between Classes and Mod's.
|
 
|
Goes Up
|
|
Goes Down
|
 
|
Goes Up
|
  |
Goes Down
|
GamePack Classes and Mods |
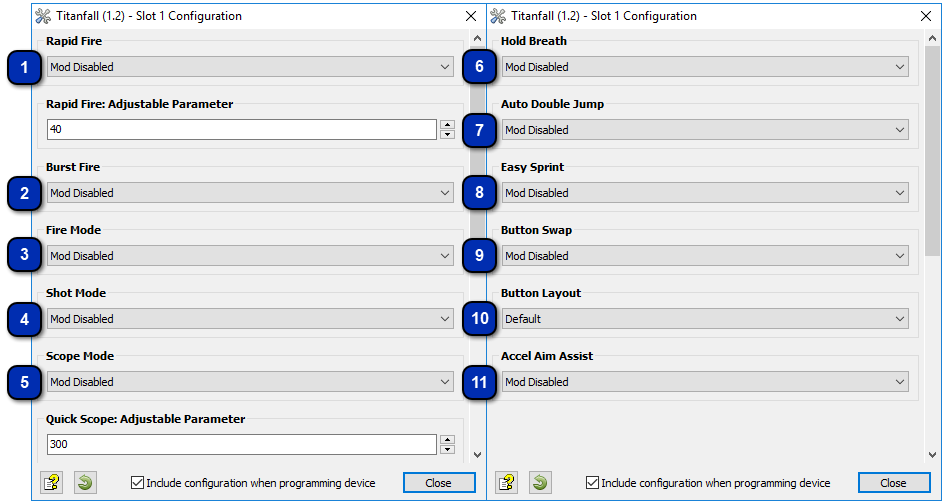
Burst
firing is designed to turn semi automatic and automatic weapons into burst firing
weapons. When this feature is enabled, your weapon will fire in bursts similar to the
M16 in older Call of Duty versions and can be used with 1, 2, 3, 4, 5, or 6 round
bursts. Burst firing can help reduce recoil and conserve ammunition.
The
Burst Fire Mod can be used by itself (With the Rapid Fire Mod disabled) or can be used
as a modifier for the Rapid Fire Mod. That is, with Burst Fire and Rapid Fire
enabled together, you will get a repeating burst of shots essentially giving you
automatic Burst Fire. The delay between the bursts can be set with the Rapid Fire
adjustable parameter allowing you to select how many rounds are fired per burst and the
amount of time between bursts for a truly customizable experience.
|
|||||||||||||||||||
Fire
mode determines an assist action to be used together with Rapid Fire and/or Burst Fire.
These are normally applied to the triggers.
|
||||||||||||||||||
Assign
an action to be performed automatically when you press the fire button.
|
||||||||||||||||||||||||||||||
Scope
modes are Mods that are associated with using the scope (ADS).
|
||||||||||||
This
Mod is specially designed for sniper rifles. It automatically holds the sniper's breath
when scoping in. Upon activation. the Mod will hold the sniper's breath when scoping.
The player no longer has to push the left analog stick to hold breath. NOTE: The
Hold Breath Mod can be used with Easy Sprint and/or Quick Scope
simultaneously.
|
|||||||||||||||
If you
are tired of constantly pressing the left analog stick to make your character sprint,
Easy Sprint is just what you have been looking for. NOTE: The Easy Sprint Mod
CAN be used with Hold Breath and Quick Scope simultaneously.
|
|||||||||||||||
This
unique feature allows you to setup special remapping to best adjust the controller to
your personal taste.
|
||||||||||||||||||
Most
users play Titanfall using the default button layout but a lot of players do use
optional button layout. With the Button Layouts you can make any of the Mods on the
CronusMAX PLUS work with your favorite button layout.
|
|||||||||||||||||
With
Accelerometer Aim Assist, you can use a Six-Axis DualShock 4 or DualShock 3 controller
to aim while scoping. This means you can move the controller to adjust the target
position when scoped in. This Mod will not affect aiming with the right stick. It will
only add an additional option to aim with. Each of the modes will add sensitivity with
mode 1 being the least sensitive and mode 5 being the most sensitive.
|
|||||||||||||||||
Combining Mod Classes |
Quick Reference: Classes and Mods |
|
01: RAPID FIRE
|
02: BURST FIRE
|
03: FIRE MODE
|
|
00:
Mod Disabled
01:
Optimized Rapid Fire
02:
Adjustable Rapid Fire (Adjustable)
03:
Pulse Rapid Fire (Adjustable)
|
00:
Mod Disabled
01:
1 Round per Burst
02:
2 Rounds per Burst
03:
3 Rounds per Burst
04:
4 Rounds per Burst
05:
5 Rounds per Burst
06:
6 Rounds per Burst
|
00:
Mod Disabled
01:
Scope Disable
02:
Scope Enable
03:
Press Sensitive
|
|
04: SHOT MODE
|
05: SCOPE MODE
|
06: HOLD BREATH
|
|
00:
Mod Disabled
01:
Drop Shot: Scope Disable
02:
Drop Shot: Press Sensitive
03:
Jump Shot: Scope Disable
04:
Jump Shot: Press Sensitive
05:
Side Shot: Scope Disable
06:
Side Shot: Press Sensitive
07:
Scope Shot: Scope Disable
|
00:
Mod Disabled
01:
Quick Scope (Adjustable)
Quick Scope Activation: Quick TAP on scope button.
|
00:
Mod Disabled
01:
Fully Auto
02:
Press Sensitive
|
|
07: AUTO DOUBLE JUMP
|
08: EASY SPRINT
|
09: BUTTON SWAP
|
|
00:
Mod Disabled
01:
Mod Enabled
|
00:
Mod Disabled
01:
Fully Auto
02:
Press Sensitive
|
00:
Mod Disabled
01:
Bumpers <> Triggers
02:
Analogs
03:
Bumpers <> Triggers + Analogs
|
|
10: BUTTON LAYOUT
|
11: ACCELEROMETER AIM ASSIST
|
|
|
00:
Default
01:
Bumper Jumper
02:
Bumper Jumper Pilot
03:
Button Kicker
04:
Evolved
05:
Fruit Loop
|
00:
Mod Disabled
01:
Sensitivity 1
02:
Sensitivity 2
03:
Sensitivity 3
04:
Sensitivity 4
05:
Sensitivity 5
06:
Sensitivity 6
|
|