The Battlefield 4 GamePackhas many exciting features including a new ADS/Fire Sensitivity algorithm that is optimized specifically for the mechanics of the Battlefield game. There's also a great Aim Assist and Auto Spot Mod which will leave your opponents in the mud. Other features include Rapid Fire, Burst Fire, Burst Fire, Auto Sprint, Flash/Laser Mod, Quick Scope and Hair Triggers. All the different default button layouts are also supported, including Alternate, Lefty and Lefty Alternate - as well as all the Bumper/Trigger Swapped layouts too. These Mods are guaranteed to improve your overall gameplay experience while giving a competitive edge.
We also invite you to join the Official Cronus Discord Channel - setup and run by members of the Cronus Community. There are several channels dedicated to GamePacks which offer live support and feedback, including direct support from developers and senior members of the Community. Use this link to join our server: https://discord.gg/mJgQyM4
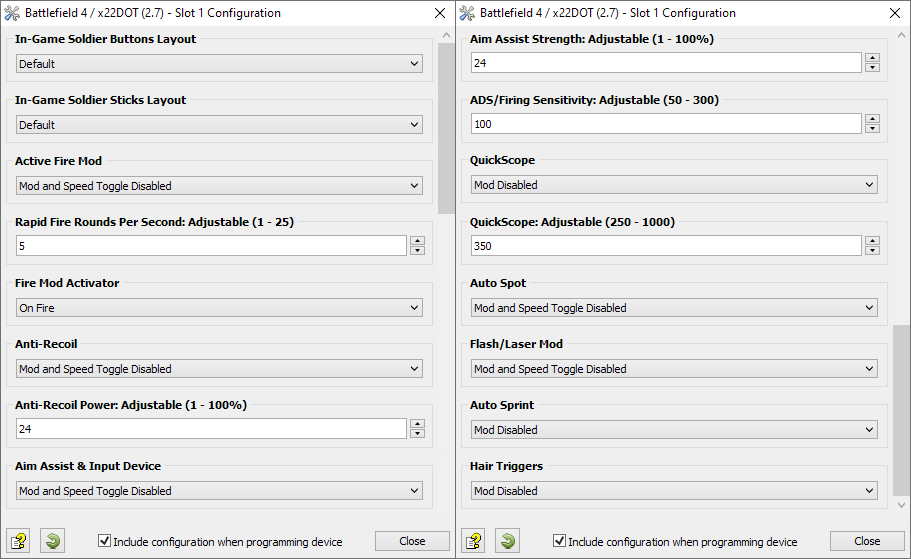
GamePack GCI Options
All GamePacks have Mods that can be tuned and customized to your preference.
This scripting engine is what makes the Cronus so powerful and extremely
popular with the gaming community. Gaming Mod configuration is now made more
accessible than ever before with the new GCI (GamePack Configuration Interface).
It pops up as soon as you program the GamePack to your Cronus (Video).
Also Available in Zen Studio
GamePack Setup - Important First Steps
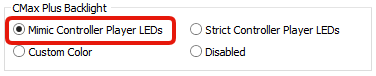
If you have a CronusMAX PLUS, open the Cronus PRO software and go to
Tools > Options > CMax Plus and enable "Mimic
Controller Player LEDs" for the backlight LED features to
work. This step is not required if you are using Cronus Zen with Zen Studio.
In-Game Soldier Buttons Layout
Setup Step 1
All default Battlefield 4 button layout options are available in this GamePack. Use the GCI (see below) to select the one you are using, and
the GamePack will automatically adjust all the Mods to your preferred choice.
This
step is critical. If you don't select the correct button layout that you are using
in-game, the Mods will not function correctly, especially Anti-Recoil. Use these game
provided layouts for optimal GamePack performance.
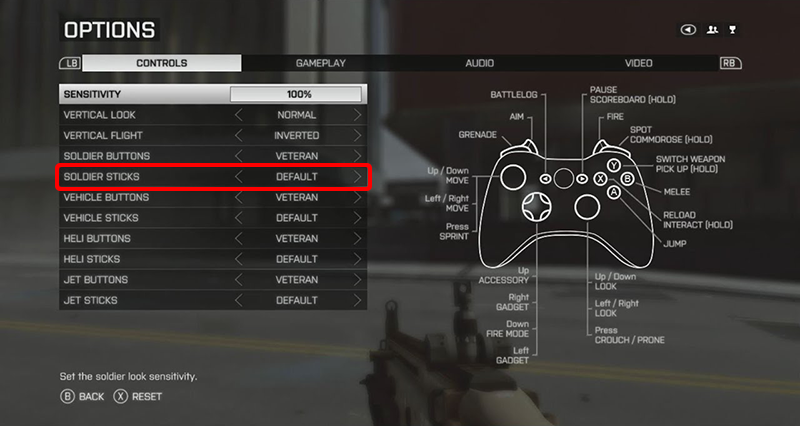
All default Battlefield 4 thumbstick layout options are available in this GamePack. Use the GCI (see below) to select the one you are using, and
the GamePack will automatically adjust all the Mods to your preferred choice.
This
step is critical. If you don't select the correct thumbstick layout that you are using
in-game, the Mods will not function correctly, especially Anti-Recoil. Use these game
provided layouts for optimal GamePack performance.
Speed Toggles allow you to enable/disable certain MODs instantly
in-game with a simple pre-configured button combo, usually
ADS + <button> (ADS is usually LT/L2 by default, but
would be LB/L1 if the Button/Trigger swap Mod was enabled). Speed Toggles
require a slightly longer press to prevent accidental triggering (only
500ms), and also have rumble feedback and LED notifications:
Speed Toggle Mod Enabled
Speed Toggle Mod Disabled
Blinks Green Twice Light Rumble
Blinks Red Twice Strong Rumble
Active Fire Mod
Mod 1 - Speed Toggle
Choose
between three Fire Mods: Adjustable Rapid Fire, Dynamic Rapid
Fire & Burst Fire. This is your main active weapon
firing mod. Each Mod also has a custom Fire Mod Activator which you can
select in the GCI.
Adjustable Rapid Fire
turns
virtually any semi-automatic weapon into a fully-automatic killing machine. You can
adjust the Rapid Fire speed rate in the GCI. The optimum fire rate
depends on the type of semi-auto weapon and/or attachments used. The Adjustable
Range is 1 - 25 Rounds Per Second (Optimum default is 5).
Dynamic Rapid Fire
detects
pressure on the Fire Trigger, so the harder you press, the faster your semi-automatic
weapon fires, allowing for improved range and accuracy with less pressure.
Burst Fire
is designed to
optimize the fire rate of fully-automatic weapons. Burst firing can help increase
precision, reduce recoil and conserve ammunition.
Note:
These settings can only be changed in the GCI, not in-game. Once
enabled, the active mod can be easily enabled/disabled in-game by using the speed toggle
ADS + D-PAD UP.
Option
Name
Description
0
Mod Disabled
All active Fire Mods are disabled. The Speed Toggle is also inactive.
1
Adjustable Rapid Fire Adjustable
Fire your semi-auto weapon using the adjustable speed setting in the
GCI.
2
Dynamic Rapid Fire
The harder you press the Fire trigger, the faster your semi-automatic
weapon fires.
3
Burst Fire
Burst Fire is enabled and optimized for fully-automatic weapons.
Fire Mod Activator
This
is the trigger activator for the active Fire Mod.
Option
Name
Description
1
On Fire
Selected Fire Mod is activated as soon as you pull the FIRE TRIGGER.
2
ADS & Fire
Selected Fire Mod is activated while holding ADS then pulling the FIRE
TRIGGER.
3
Fire Only
Selected Fire Mod is activated as soon as you pull the FIRE TRIGGER. ADS
is blocked while firing.
4
Primary Weapon Only (On Fire)
Selected Fire Mod is activated as soon as you pull the Primary Weapon
FIRE TRIGGER.
5
Secondary Weapon Only (On Fire)
Selected Fire Mod is activated as soon as you pull the Secondary Weapon
FIRE TRIGGER.
This
version of Anti-Recoil no longer relies on the old Anti-Recoil method of 'static'
pulldown. It now knows when to stop in every direction (Y and X Axis) to prevent
unwanted compensation when aiming up and aiming down. Remember, there isn't a
one-size-fits-all setup for Anti-Recoil sensitivity due to different weapons having
different perks and attachments affecting weight distribution.
Tip
Try different adjustable recoil weight values for your
favorite weapons and set to whatever you feel works best
for you. The Adjustable Range is 1 - 100
(Default is set to 24).
If your weapon is moving UP when you
fire, you need a LARGER number in the
adjustable parameter.
If your weapon is moving DOWN when you
fire, you need a SMALLER number in the
adjustable parameter.
Note:
These settings can only be changed in the GCI, not in-game. Once
enabled, Anti-Recoil can be easily enabled/disabled in-game by using the speed toggle
ADS + D-PAD DOWN.
Option
Name
Description
0
Mod Disabled
Anti-Recoil is disabled. The Speed Toggle is also inactive.
1
Anti-Recoil Adjustable
Anti-Recoil is activated while firing.
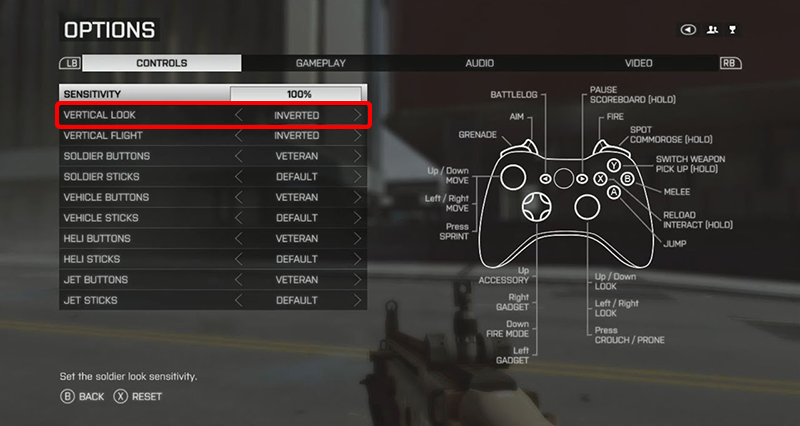
2
Inverted-Y Adjustable
Anti-Recoil with Inverted-Y Axis is activated while firing. (In-Game
'VERTICAL LOOK' setting must be set to 'INVERTED' - see image below).
3
Bipod Standard Adjustable
Anti-Recoil is activated while equipped with a Bipod attachment and
firing.
4
Bipod Inverted-Y Adjustable
Anti-Recoil is activated while equipped with a Bipod attachment and
firing. (In-Game 'VERTICAL LOOK' setting must be set to 'INVERTED' - see
image below).
The
Aim Assist mod tricks the in-game Aim Assist to always be on by using an exploit that
moves the cross-hairs around the actual aim point in a diamond pattern. so when the
target it moving it fools the game into thinking you're tracking with the target and it
will pull the cross-hairs along with it. Controllers and mice have different deadzones
that affect Aim Assist calculations, so we've included the optimum range for both in
this GamePack.
For more information on how Aim Assist works, check out this informative article from the Cronus Community. Remember, there isn't a one-size-fits-all setup for Aim Assist due to different weapons having different perks and attachments affecting weight distribution. We suggest you try different adjustable values with each weapon and set to whatever you feel works best for you.
Tip
The Aim Assist Offset Value is measured from the
Aim Point. The larger the value, the
bigger the offset. The bigger the offset, the more
cross-hair shaking you will experience, but a stronger
Aim Assist.
You can set a custom Aim Assist
Strength value in the GCI.
This will help fine tune your weapon's offset from the
original Aim Point. The
Adjustable Range is 10% - 100% (Default is set to
24%). Don't forget to share your best settings
in the CRONUS COMMUNITY SUPPORT TOPIC
for this Mod.
Note:
These settings can only be changed in the GCI, not in-game. Once
enabled, Aim Assist can be easily enabled/disabled in-game by using the speed toggle
ADS + D-PAD LEFT.
Option
Name
Description
0
Mod Disabled
Aim Assist is disabled. The Speed Toggle is also inactive.
1
Aim Assist (CONTROLLER) Adjustable
Aim Assist is activated while firing using a controller.
2
Aim Assist (CRONUS ZEN / XIM) Adjustable
Aim Assist is activated while firing using a mouse (Cronus Zen or XIM).
All in-game sensitivity settings must be set to maximum.
This
option allows you to customize the speed at which your cross-hairs move while aiming and
firing.
You
can set a custom ADS/Fire Sensitivity value in the GCI - this will help fine tune
your cross-hair speed. Adjustable Range is 50 - 300 (Default 100 - meaning 100%
of the stick input is sent to the console). Don't forget to share your best
settings in the CRONUS COMMUNITY SUPPORT TOPIC
for this Mod.
Tip
The higher the value the faster your cross-hairs will
move in response to stick input. Lower values
require greater stick input to move the cross-hairs.
The
Quick Scope Mod will automatically scope in, take a shot, and scope out. Perfecting the
aiming and timing will allow you to become a one-man commando.
You
can set a custom Quick Scope Animation Delay time in the GCI. A brief pause is required
in-between the ADS and Fire animation, and this value varies from weapon to weapon.
The Adjustable Range is 1 - 1000 (Optimum default is set to 350). Don't
forget to share your best settings in the CRONUS COMMUNITY SUPPORT TOPIC
for this Mod.
Note:
These settings can only be changed in the GCI, not in-game.
Option
Name
Description
0
Mod Disabled
Quick Scope is disabled.
1
Quick Scope Adjustable
As soon as you press the ADS TRIGGER, the Mod will automatically
scope in, take a shot, and scope out.
2
Press Sensitive
Adjustable
Same as above but the Quick Scope is activated when the ADS trigger is
FULLY pressed over 95%.
Automatically spot your opponents from across the battlefield. With the Auto Spot Mod
active, your character will mark where your opponents are located simply by looking in
their general direction. A ridiculous advantage in team matches.
Note:
These settings can only be changed in the GCI, not in-game.
Option
Name
Description
0
Mod Disabled
Auto Spot is disabled. The Speed Toggle is also inactive.
1
On Fire Only
Auto Spot is activated as soon as you press the FIRE TRIGGER. ADS is
blocked.
2
On ADS Only
Auto Spot is activated as soon as you press the ADS TRIGGER. FIRE is
blocked.
3
On Fire
Auto Spot is activated as soon as you press the FIRE TRIGGER.
4
Always On
Auto Spot is Always On (Speed Toggle on/off with RB/R1)
Battlefield weapons have two different attachments, Laser Sight (low flash, hip fire accuracy) and Flash Light (high flash, brighten room) that can both be weaponized
with this awesome Mod.
The
problem with having a light attachment active is that it is on all the time, giving away
your position and making you very easy to spot. This Flash Light/Laser Mod allows you to
move around with the tactical light attachment off, and as soon as you FIRE or ADS &
FIRE (depending on your selection) it will activate and turn on the light attachment,
then deactivate and turn off as soon as you depress. This allows a brilliant tactic of
blinding your enemies without giving your position away. There is also a strobe option
to add an extra layer of confusion to whoever you just smoked.
Think of this as your own mini Flash-Bang!
Note:
These settings can only be changed in the GCI, not in-game. Once
enabled, the Flash Light/Laser Mod can be easily enabled/disabled in-game by using the
speed toggle ADS + D-PAD RIGHT.
Option
Name
Description
0
Mod Disabled
Flash Light/Laser Mod is disabled. The Speed Toggle is also inactive.
1
On ADS & Fire
Flash Light/Laser Mod is activated and turned on as soon as you FIRE
while holding ADS.
2
On Fire
Flash Light/Laser Mod is activated and turned as soon as you FIRE.
3
Strobe On ADS & Fire
Flash Light/Laser Mod is activated and strobe effect turned on as soon
as you FIRE while holding ADS.
4
Strobe On Fire
Flash Light/Laser Mod is activated and strobe effect turned on as soon
as you FIRE.
If you
are tired of constantly pressing the left analog stick to make your character sprint,
Auto Sprint is just what you need.
Note:
These settings can only be changed in the GCI, not in-game.
Option
Name
Description
0
Mod Disabled
Auto Sprint is disabled.
1
Always Sprint
Sprint as soon as you press the left analog stick forward.
2
Press Sensitive (Left Stick >95%)
Sprint if the left analog stick is almost fully pressed forward (at
least 95%). You will walk at regular speed if the analog stick is only
slightly pressed forward.
Battlefield applies a "dead-zone" to the trigger buttons, which means the
triggers (either shooting or ADS) need to be pressed almost half way down before they
are registered by the game. With this Hair Trigger Mod you can ensure your weapon will
fire or ADS at the slightest amount of pressure. When using this Mod, the LT/L2 and
RT/R2 triggers are digitally converted so that they perform with ultra sensitivity
without having to hardwire any extra components to your controller - saving both your
warranty, time and money.
Note:
These settings can only be changed in the GCI, not in-game.
Option
Name
Description
0
Mod Disabled
Hair Triggers is disabled.
1
Hair Triggers
Fire or ADS will now activate at the slightest amount of Trigger
pressure.
Utility toggles are designed to give you additional control of the GamePack
in real-time. A simple tap of a pre-configured button combo and the toggle
is instantly activated. All toggles have rumble feedback and LED
notifications if enabled.
Global Killswitch
Utility 1 - Speed Toggle
Quickly enable or disable the entire GamePack with this convenient killswitch toggle.
When this GamePack is being used on a PlayStation 4 and detects the
connected controller is not a DualShock 4, it will automatically reassign
Touchpad to the Select/Back/View Button and enable a toggle to the PS4 Share
Screen.
Crossover
Shortcut to DualShock 4 Touchpad:
Toggle to
PlayStation 4 Share Screen:
Troubleshooting
If you find your GamePack isn't working correctly, the memory in the Cronus device where the settings are stored may have become corrupted. In this case, we recommend that you erase your memory slots using the Cronus Pro option in Tools > Device Cleanup > Erase Memory Slots, or if you are using Zen StudioDevice > Erase Memory Slots.
If you're still having issues and want to check that your Cronus Device is functioning correctly with scripts, but you're not too sure how to test, we recommend you try out the easy to use Cronus Stress Test Script by Cronus Community senior staff member, Lex Lost.
Battlefield and Battlefield 4 are registered trademarks of Electronic Arts Inc. in the U.S. and/or other countries.
The “PS” Family logo is a registered trademark and “PS4” is a trademark of Sony Computer Entertainment Inc.
Microsoft, Xbox One and the Xbox logos are trademarks of the Microsoft group of companies.
Other product names used herein are for identification purposes only and might be trademarks of their respective companies. We disclaim any and all rights to those marks.