Automatic PS4 Crossover |
 |
 |
 |
 |
 |
|
|
|
|
 |
 |
|
|
|
|
 |
 |
|
|
 |
 |
|
Press Select + Left Analog Stick (L3) together.
|
|
|
|
 |
|
Press Back + Left Analog Stick (LS) together.
|
|
|
|
 |
|
Press View + Left Analog Stick (LS) together.
|
GamePack Operation |
|
|
|
 |
|
 |
|
|
|
|
|
|
 |
|
|
|
|
 |
|
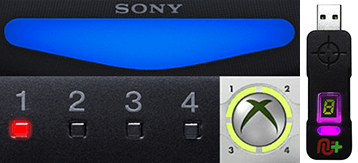 |
Player LED 1: Controller in regular mode, the GamePack is Disabled (Blue on DS4 / CronusMAX PLUS Backlight LED).
Player LED 4: The GamePack is Enabled (Pink on DS4 / CronusMAX PLUS Backlight LED).
|
GamePack Configuration |
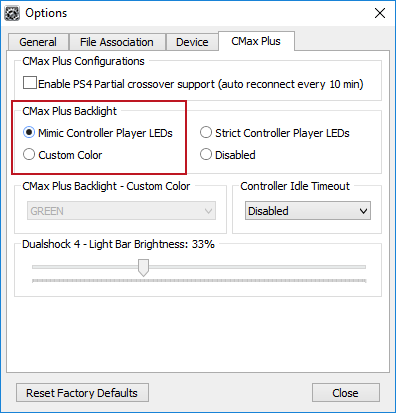
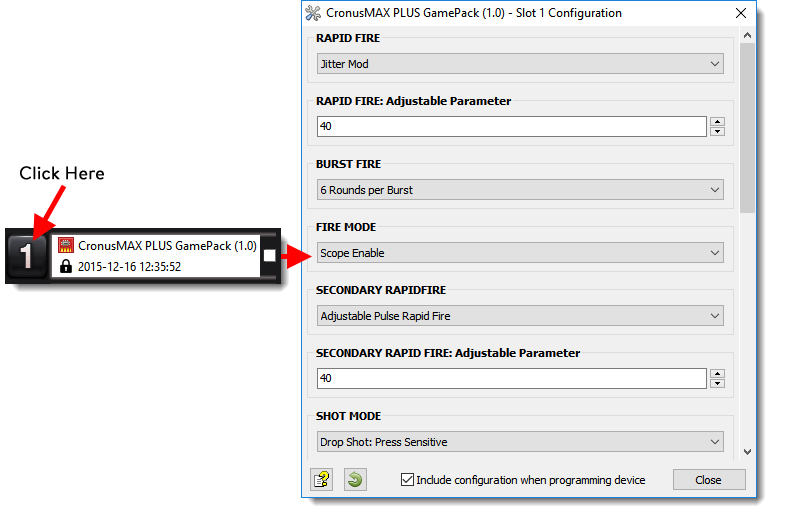
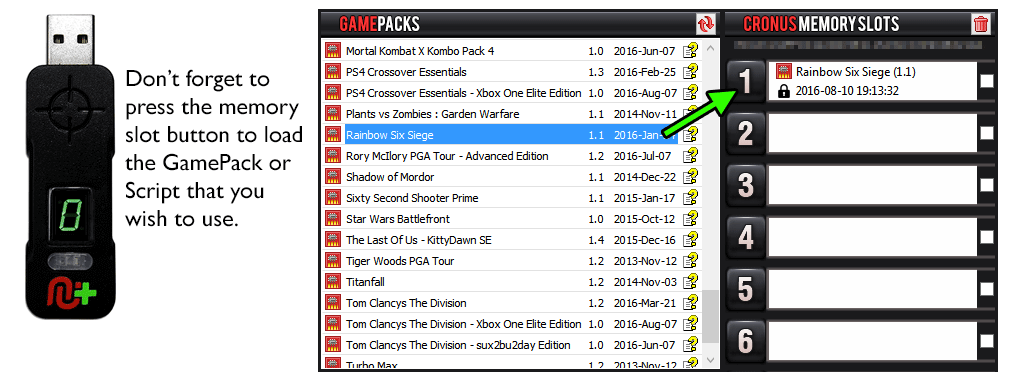
Pre-configure your GamePack settings using the GamePack Configuration Interface (GCI) in the Cronus PRO software. The GCI opens automatically when you load a GamePack to a memory slot, or you can simply click on the memory slot number to the left of the loaded GamePack to open the GCI. As soon as you select your preferred settings, close the GCI and click the PROGRAM DEVICE button. To select the GamePack you wish to use on your console, press the Memory Slot button on the CronusMAX PLUS so that it highlights the corresponding number on the LED (so if you have a GamePack loaded to Memory Slot 1, the LED on the CronusMAX PLUS should display the number 1).
|
|
|
 |
|
Hold SELECT+START for 2 seconds to enter menu mode.
|
|
|
|
 |
|
Hold SHARE+OPTIONS for 2 seconds to enter menu mode*
|
|
|
|
 |
|
Hold BACK+START for 2 seconds to enter menu mode.
|
|
|
|
 |
|
Hold VIEW+MENU for 2 seconds to enter menu mode.
|
|
|
Player LED 4 will blink the number of the current Class (DS4 / CronusMAX PLUS Backlight LED will flash Pink).
Player LED 3 will blink the number of the active Mod for the current Class (DS4 / CronusMAX PLUS Backlight LED will flash Green).
Note: If the Player LED 3 is not blinking, it means either no Mod is loaded/disabled or the default setting is selected for the current Class. See below for instructions how to navigate between Classes and Mod's.
|
 |
If you have an Xbox One Controller, the Right Trigger will rumble the number of the current Class (CronusMAX PLUS Backlight LED will flash Pink).
If you have an Xbox One Controller, the Left Trigger will rumble the number of active Mod for the current Class (CronusMAX PLUS Backlight LED will flash Green).
|
  |
Goes Up
|
|
Goes Down
|
  |
Goes Up
|
  |
Goes Down
|
GamePack Video Guide & Demonstration |
GamePack Classes and Mods |
This class to give you the option of how you want the GamePack to notify you when the Auth Timeout is close to occurring. You have the option of being notified by LED 4 / CronusMAX PLUS Backlight LED flashing or LED 4 / CronusMAX PLUS Backlight LED flashing plus the controller rumbling.
This MOD is not required if you are using a USB Hub for PS4 Full Time Cross Over Support.
| ||||||||||||
This class remaps the Right Analog Stick to the Touchpad movement. It is only active when the conditions set out in Classes 5 & 6 are true. There are two options for the Touchpad control, Linear and Movement Based. You can also choose under which circumstances the Right Stick is remapped to the Touchpad, a Toggle System or Hold System.
When using the two button system, the selected buttons will be disabled when pressed together. | |||||||||||||||||||||
This class lets you choose how Select/Back/View and Start/Menu is remapped to the Touchpad.
| |||||||||||||||||||||||||||
Choose which button to use in conjunction with Mods 3 or 4 in Class 3.
It is recommended to use two buttons as when they are both pressed, the signals to the console for those buttons are blocked. Using just one button to activate the Touchpad Remapping Mod can interfere with gameplay. A combination of two buttons which aren't used together by the game is a safer option (Class 5 is the first button, Class 6 is the second button).
| |||||||||||||||||||||||||||||||||||
Choose whether or not to use a second button with Mods 3 or 4 in Class 3.
It is recommended to use two buttons as when they are both pressed, the signals to the console for those buttons are blocked. Using just one button to activate the Touchpad Remapping Mod can interfere with gameplay. A combination of two buttons which aren't used together by the game is a safer option (Class 5 is the first button, Class 6 is the second button).
| |||||||||||||||||||||||||||||||||||
When Rapid Fire is enabled, you can turn virtually any semi automatic weapon into a fully automatic weapon. This creates a very unique advantage for players using semi automatic weapons. While Rapid Fire will not usually make a fully automatic gun shoot any faster, it can have positive side effects on fully automatic guns such as reducing recoil, helping players conserve ammunition and achieve more headshots.
While in this Class - Press LB to decrease / Press RB to Increase delay on the adjustable parameter. Press RT to test. Also, while mods are active, hold Back/Select/View/Share/Touchpad and press X/Square to Enable/Disable Rapid Fire/Burst Fire.
| |||||||||||||||
Fire Mode determines an assist action to be used together with Rapid Fire and/or Burst Fire. These are normally applied to the triggers.
| ||||||||||||||||||
Here, you let the game know what your in game settings are for the ADS and FIRE buttons so it knows which buttons to monitor and control for classes 7, 8 and 11.
| |||||||||||
Burst firing is designed to turn semi automatic and automatic weapons into burst firing weapons. When this feature is enabled, your weapon will fire in bursts similar to the M16 and can be used with 1, 2, 3, 4, 5, or 6 round bursts. Burst firing can help reduce recoil and conserve ammunition.
| |||||||||||||||||
This Mod compensate for vertical recoil while firing a weapon by automatic moving the control stick in the opposite direction of the one your gun is moving while firing. The adjustable parameter sets how much the compensation should be.
Remember, there isn't a one-size-fits-all setup for Anti-Recoil sensitivity due to different weapons having different perks and attachments affecting weight distribution. We suggest you try different adjustable values with each weapon and set to whatever you feel works best for you. We would appreciate if you share these values with the CronusMAX Support Community to help others :)
Check Class 14 to make sure the correct stick selection is made for this MOD to work correctly. You can now adjust Anti-Recoil and test your settings within the game menu and with each weapon without having to set/save/restart every time to test each setting and each weapon. This is a new awesome feature that allows you to optimize your weapon's settings on-the-fly saving you a TON of time! (In Menu Mode: LB/L1 Decrease Weight - RB/R1 Increase Weight - RT/R2 Test).
If your weapon is moving UP when you fire, you need a LARGER number in the adjustable parameter. If your weapon is moving DOWN when you fire, you need a SMALLER number in the adjustable parameter.
| |||||||||||||||||||||||||||||||||
If you are tired of constantly pressing the left analog stick to make your character sprint, Auto Sprint is just what you have been looking for. We cover both types of sprint systems, Tap and Toggle. Tap Systems are games where there is usually stamina involved and the button has to be constantly tapped or resumed once stamina has run out (like Call of Duty) and Toggle Systems are games where there is no stamina and you'd normally have to hold down the sprint button the entire time (like GTA).
Check Class 14 to make sure the correct stick selection is made for this MOD to work correctly. While mods are active, hold Back/Select/View/Share/Touchpad and press LB/L1 to Enable/Disable the Auto Sprint.
| |||||||||||||||||||||
Here you tell the GamePack how your Sticks are setup in game. This is required for the Anti-Recoil and Auto Sprint Mods.
| |||||||||
Quick Reference: Classes and Mods |
|
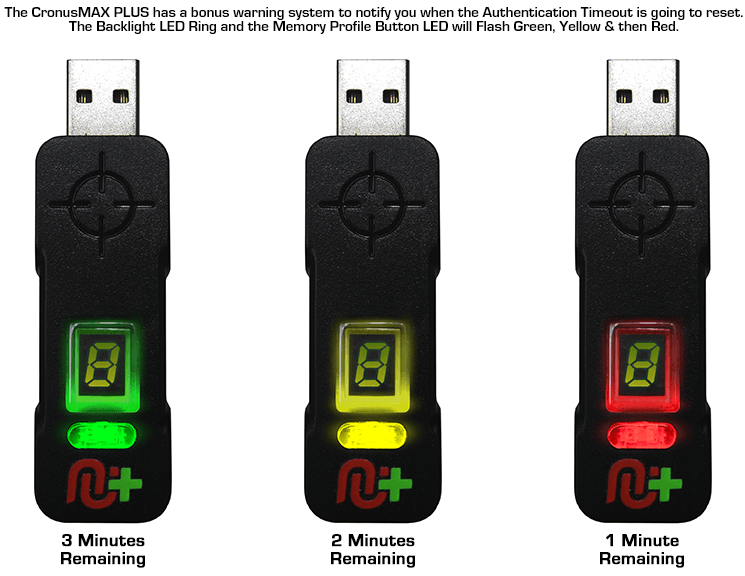
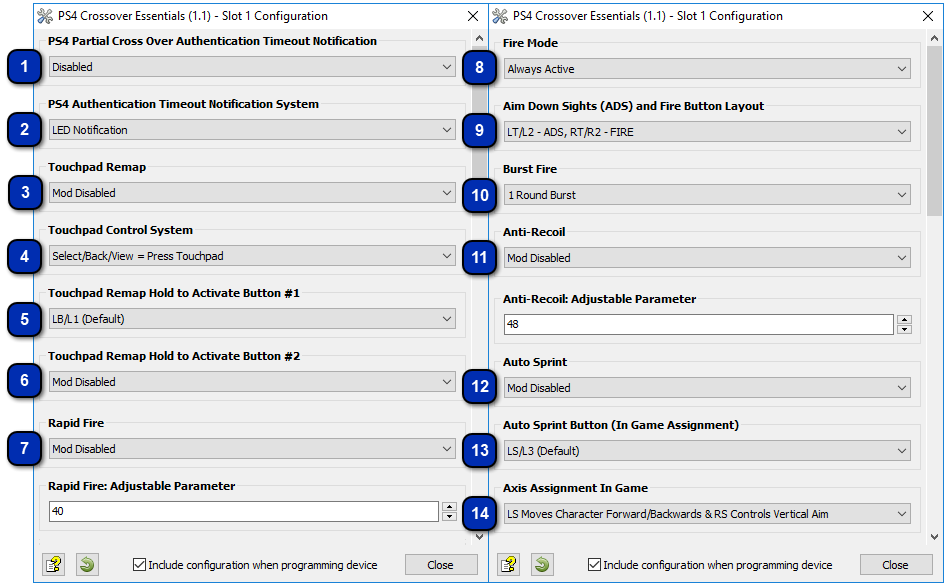
01: PS4 PARTIAL CROSSOVER AUTH TIMEOUT
|
02: PS4 AUTH TIMEOUT NOTIFICATION SYSTEM
|
03: TOUCHPAD REMAP
|
|
00: Mod Disabled (1.20+ FW USB Hub Users)
01: 30 Seconds
02: 1 Minute
03: 1 Minute 30 Seconds
04: 2 Minutes
05: 2 Minutes 30 Seconds
06: 3 Minutes
Backlight LED Colors:
3 Minutes: Green
2 Minutes: Yellow
1 Minute: Red
|
00: LED Notification
01: LED + Rumble Notification
|
00: Mod Disabled
01: Linear (Toggle System)
02: Movement Based (Toggle System)
03: Linear (Hold System)
04: Movement Based (Hold System)
|
|
04: TOUCHPAD CONTROL SYSTEM
|
05: TOUCHPAD REMAP ACTIVATE BUTTON #1
|
06: TOUCHPAD REMAP ACTIVATE BUTTON #2
|
|
00: Select/Back/View = Press Touchpad
01: Tap to Press Touchpad
Tap Select/Back/View = Press Touchpad Left
Tap Start/Menu = Press Touchpad Right
Hold Select/Back/View = Share
Hold Start/Menu = Options
02: Hold To Press Touchpad
Tap Select/Back/View = Share
Tap Start/Menu = Options
Hold Select/Back/View = Press Touchpad Left
Hold Start/Menu = Press Touchpad Right
|
00: LB/L1 (Default)
01: RB/R1
02: RT/R2
03: RS/R3
04: LB/L1
05: LT/L2
06: LS/L3
07: DPAD-UP
08: DPAD-DOWN
09: DPAD-LEFT
10: DPAD-RIGHT
11: Y/TRIANGLE
12: B/CIRCLE
13: A/CROSS
14: X/SQUARE
|
00: Mod Disabled
01: RB/R1
02: RT/R2
03: RS/R3
04: LB/L1
05: LT/L2
06: LS/L3
07: DPAD-UP
08: DPAD-DOWN
09: DPAD-LEFT
10: DPAD-RIGHT
11: Y/TRIANGLE
12: B/CIRCLE
13: A/CROSS
14: X/SQUARE
|
|
07: RAPID FIRE
|
08: FIRE MODE
|
09: ADS & FIRE BUTTON LAYOUT
|
|
00: Mod Disabled
01: Rapid Fire (Adjustable)
02: Burst Fire (Adjustable - See Class 10)
|
00: Always Active
01: Scope Disable
02: Scope Enable
03: Press Sensitive
|
00: LT/L2 - ADS, RT/R2 - FIRE
01: LB/L1 - ADS, RB/R1 - FIRE
|
|
10: BURST FIRE VARIABLE
|
11: ANTI-RECOIL
|
12: AUTO SPRINT
|
|
01: 1 Round Burst
02: 2 Round Burst
03: 3 Round Burst
04: 4 Round Burst
05: 5 Round Burst
06: 6 Round Burst
|
00: Mod Disabled
01: Anti-Recoil
02: Anti-Recoil (Scope Disable)
03: Anti-Recoil (Scope Enable)
04: Inverted-Y Anti-Recoil
05: Inverted-Y Anti-Recoil (Scope Disable)
06: Inverted-Y Anti-Recoil (Scope Enable)
|
00: Mod Disabled
01: Always On (Tap to Sprint System)
02: Press Sensitive (Tap to Sprint System)
03: Always On (Toggle System)
04: Press Sensitive (Toggle System)
|
|
13: AUTO SPRINT BUTTON
|
14: AXIS ASSIGNMENT IN GAME
|
|
|
00: LS/L3 (Default)
01: RB/R1
02: RT/R2
03: RS/R3
04: LB/L1
05: LT/L2
06: LS/L3
07: DPAD-UP
08: DPAD-DOWN
09: DPAD-LEFT
10: DPAD-RIGHT
11: Y/TRIANGLE
12: B/CIRCLE
13: A/CROSS
14: X/SQUARE
|
00: Left Stick Moves Character Forward/Backwards and Right Stick Controls Vertical Aim
01: Left Stick Controls Vertical Aim and Right Stick Moves Character Forwards/Backwards
|
|