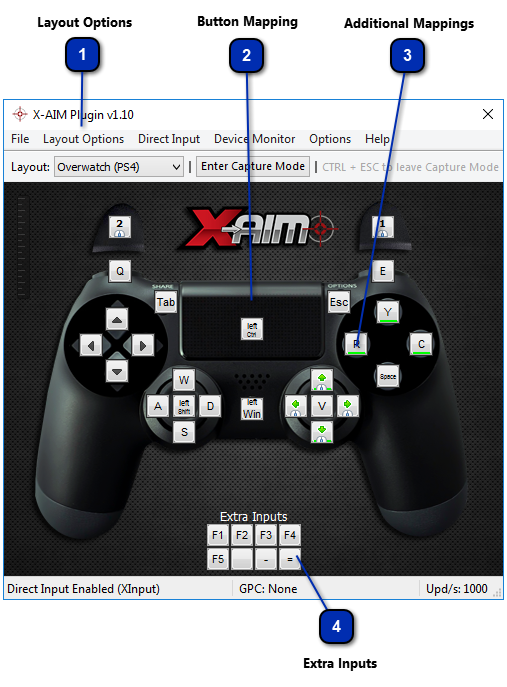
Button Mapping
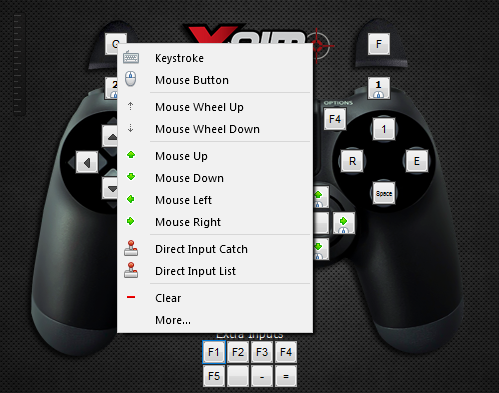
Mapping the keyboard and mouse to a X-AIM layout is easy, as well as binding a Direct Input entry. Simply right click on any layout button and pick an option from the popup menu. The layout can be highly customized, meaning you can link any keyboard, mouse or DI input to any controller entry. For example you can assign a mouse movement to the motion sensor or to a regular controller button, so when you push your mouse up it will be translated to the CROSS button.
IMPORTANT INFORMATION
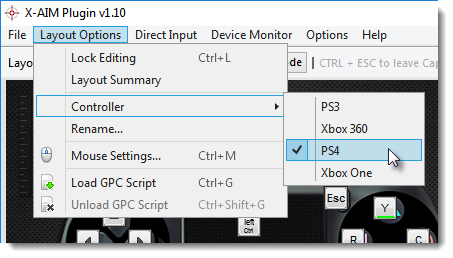
The popup menu will not open if the layout editing is locked in the Layout Options menu.
• Keystroke: Assign a keyboard key to the selected controller entry. By choosing this item a dialog box will open to read the input key. X-AIM can recognize virtually any key available in your keyboard. International keyboards may show different key symbols on the layout buttons.
• Mouse Button: Assign a mouse button to the selected controller entry. By choosing this item a dialog box will open to read the mouse button. X-AIM supports a mouse with up to 5 buttons.
• Mouse Wheel: Assign the mouse wheel up or the mouse wheel down events to the selected controller entry.
• Mouse Movement: Assign a mouse movement (up, down, left or right) to the selected controller entry. The mouse movement is usually assigned to the right analog stick, but you can assign this input to any button entry.
• Direct Input Catch: Bind a DI input to the selected controller entry. By choosing this item a dialog box will open to read the DI input button from the controller.
• Direct Input List: Bind a DI input to the selected controller entry. Choose a DI input from a list.
• Clear: This option will clean all assignments on the selected controller entry.
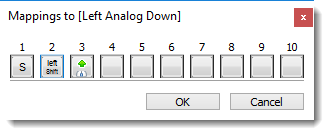
• More: Assign up to 10 inputs to the selected controller entry, check out the next subject ( Additional Mappings) for more details in this regard.
Binding a DI input to the selected controller entry
By clicking on the [Direct Input Catch], a dialog box will open and wait for the user to press a button or an analog direction on the controller.
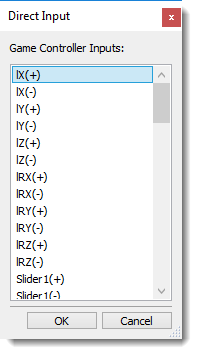
Alternatively, clicking on the [Direct Input List] a dialog window will popup with all available game controller inputs. Select the appropriate input and hit the OK button to save your selection, or click on the Cancel button to close the window without any changes. The user can check which inputs are active for the currently connected game controller on the DI Settings window.
• Analog Inputs (lX, lY, lZ, lRX, lRY, lRZ, Slider1 and Slider2)
Each analog input is split in two, by its signal, representing one specific direction (up, down, left, right, forward or back). The meaning of the direction is dependent on the Direct Input entry and of the controller model.
• D-Pad Inputs (POV1, POV2, POV3 and POV4)
The POV members contains the D-Pad position in degrees clockwise from north. Where 0 means UP, 90 means RIGHT, 180 mean DOWN and 270 means LEFT.
Up to 4 D-Pads are supported, however only the POV1 is commonly found in game controllers.
• Button Inputs (Button 1 to 32)
The Buttons are grouped in an array of entries, one for each of 32 buttons. The meaning of each button is dependent on the controller in use. You can check the button actuations on the DI Settings window.
|